Shokupan (Japanese Milk Bread)
Make authentic Shokupan (Japanese Milk Bread) at home with pro tips. This iconic loaf is milky-sweet with a soft, airy, cloud-like crumb.
Dish: Shokupan
Variant: Shokupan (Japanese Milk Bread)
- Total time
- 4 hr
- Active time
- 1 hr
- Yield
- 1, 1 loaf
- Difficulty
- Medium
- Equipment
- 4 required
Ingredients and Constraints
Ingredients
Ingredient watchpoints2 watchpoints
Short requirements and tradeoffs to check while gathering ingredients; detailed source notes stay expandable.
Skim Milk Powder
22 g skim milk powder or nonfat dry milk powder
The source ingredient row lists alternatives.
Details and source
Acceptable alternatives: Nonfat Dry Milk Powder
Unsalted Butter
28 g unsalted butter ((at room temp in winter and cold in summer; for vegan, see Notes) )
The source row includes a form, size, temperature, preparation, or handling detail.
Details and source
Additional ingredient notes
Ingredients for Shokupan
(Baker’s percentages in parentheses) Water (71%) – Water temperature matters; see my tips below Sugar (6%) Diamond Crystal kosher salt (2%) Honey (3%) Instant yeast (2%) – I use bread machine yeast or SAF instant yeast.
Avoid yeast that has been stored in the fridge or freezer for more than 6 months. When in doubt, test-proof it first.
Variations
There are fun and delicious variations on shokupan that you can try and I suggest a few of them here.
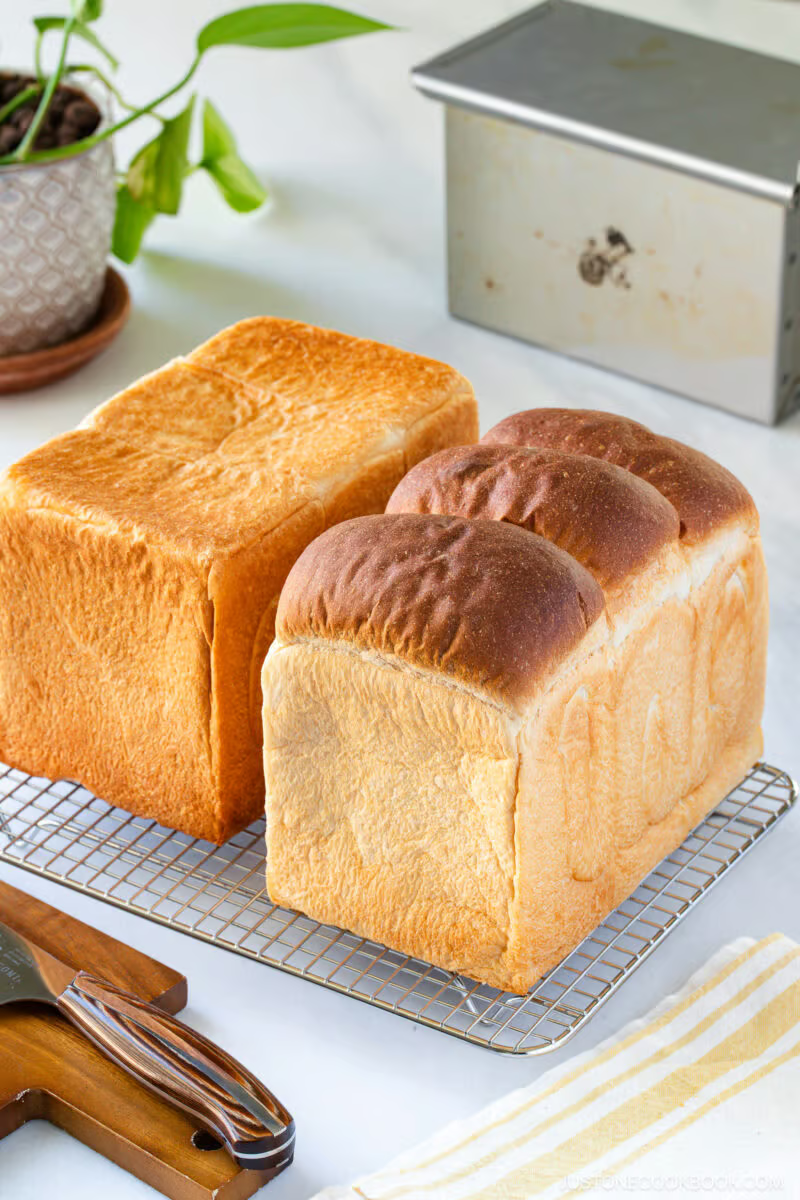
Swap the honey for maple syrup or agave, the milk powder for coconut milk powder—do not use soy milk powder, as it inhibits the rise—and use Miyoko’s unsalted vegan butter for a delicious plant-based loaf. This recipe makes two classic styles: a flat-top loaf baked with the lid on for clean, uniform slices, or a round-top loaf baked open for a rustic, domed finish.
Show 1 more media item
Required setup
Equipment
Source recipe card equipment.
Source recipe card equipment.
Source recipe card equipment.
(optional, but highly recommend)
Before You Cook
Constraints, controls, and warnings to review before starting.
Decisions before cookingDetails4
Reviewed comparisons and tradeoffs that affect the path before the first active step.
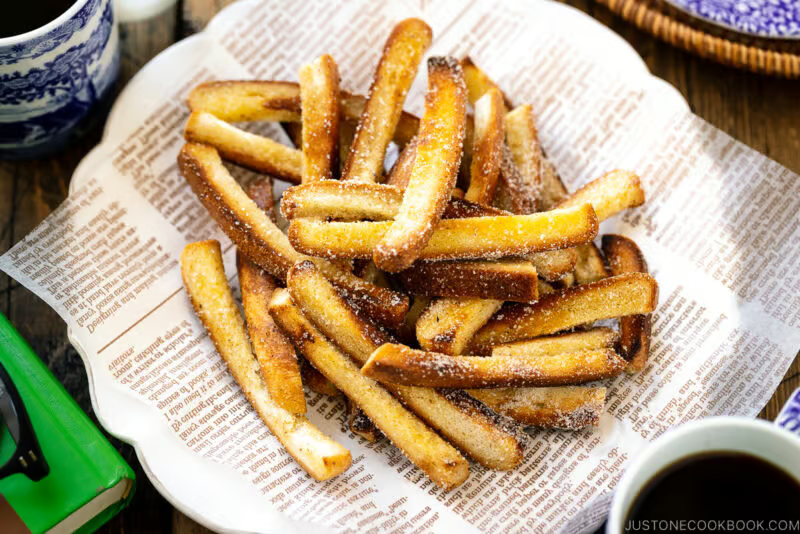
Different Ways to Enjoy Japanese Milk Bread
Japanese milk bread is incredibly versatile.
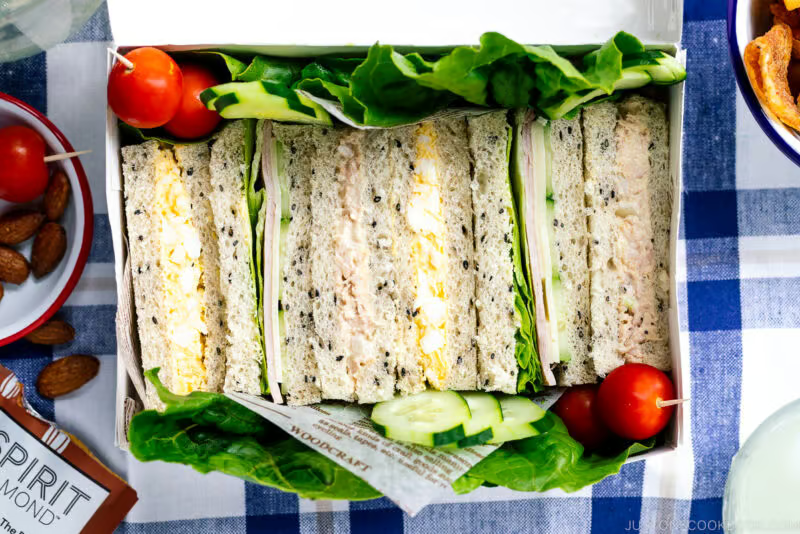
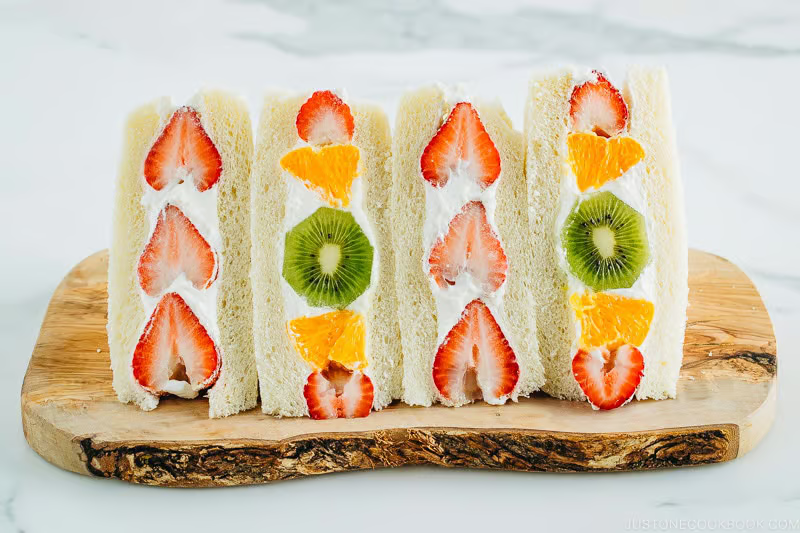
Here are some of my favorite ways to enjoy it, from breakfast through dessert. Simple breakfast toast – Score the slice with a diamond pattern, toast it, and top with butter and jam. For something special, try Ogura Toast—Nagoya’s iconic breakfast with butter, sweet red bean paste, and whipped cream. Pizza Toast – Japanese Pizza Toast with homemade sauce, ham, and cheese was my son’s favorite after-school snack. Sandwiches (Sando) – Shokupan is the star of Egg Sando, Katsu Sando, and Fruit Sando. Sweet treats and desserts – Don’t throw out those sandwich crusts! Turn them into crispy Shokupan Crust Rusks coated in butter and sugar, or use leftover shokupan for sweet, custardy Pan Pudding with caramel sauce.


Show 1 more media item
Do I need to use the yudane or tangzhong method for shokupan?
No—and here’s why I don’t.
Both methods involve precooking a small portion of flour, which causes the starch to gelatinize. This gives the bread a chewier, mochi-mochi texture and keeps it moist longer. The trade-off: the dough is stickier, harder to knead, and doesn’t rise as high. Most English-language shokupan recipes online use this method, so it may seem like the standard—but it’s not how bakeries and home bakers in Japan traditionally make shokupan. It’s simply another variation. My recipe is straightforward, easy, and reliable. Starting from scratch, I can make a fantastic shokupan in 4 hours—something I can bake once a week without hesitation.
Water temperature guide
Source FAQ gives starting water temperatures for different kitchen temperatures.
| Kitchen temperature | Water temperature |
|---|---|
| Very cold kitchen | room-temp water, 68–76°F (20–24°C) |
| Cool kitchen | slightly cool water, 65–68°F (18–20°C) |
| Moderate kitchen | cold water, 61–65°F (16–18°C) |
| Warm to hot kitchen | very cold water, 54–61°F (12–16°C) Bake a few loaves, check your dough temperature after kneading, and adjust up or down by a few degrees until you consistently hit 79–82°F (26–28°C). Want to go deeper? See the next two FAQs on DDT and the formula. |
DDT example calculations
Source FAQ shows example water temperatures calculated from room, flour, and friction-factor values.
(DDT x 3) - room temp - flour temp - friction factor = water temperature
| Kitchen temperature | Calculated water temperature | Notes |
|---|---|---|
| Very cold kitchen (room 59°F) | 77°F | (80 × 3) − 59 − 68 − 36 |
| Cool kitchen (room 68°F) | 68°F | (80 × 3) − 68 − 68 − 36 |
| Moderate kitchen (room 75°F) | 61°F | (80 × 3) − 75 − 68 − 36 |
| Warm to hot kitchen (room 82°F) | 54°F | (80 × 3) − 82 − 68 − 36 |
Preflight checklist
Process controls
- Temperature: 68-76°F
- Temperature: 79-82°F
Method Overview
Structured method notes that are separate from the step timeline.
Recipe Highlights
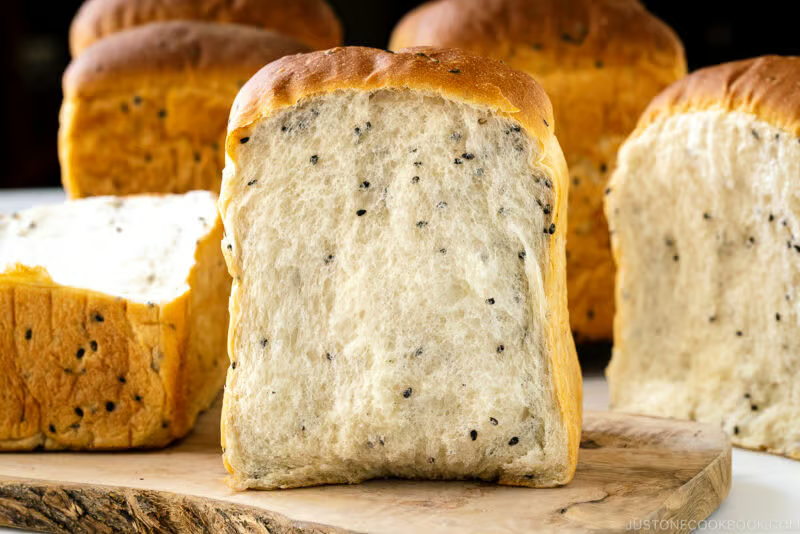
Growing up in Japan, I ate shokupan (食パン) for breakfast almost every morning.
Unlike brioche, which relies on eggs and significantly more butter, shokupan is lighter and more delicate, with a subtly sweet, milky flavor. This pillowy-soft Pullman loaf is sometimes called Hokkaido milk bread outside of Japan, named after the region’s famous dairy ingredients.
Why I Updated This Recipe
If you’ve made my shokupan before, you’ll notice the ingredient amounts are about 10% larger.
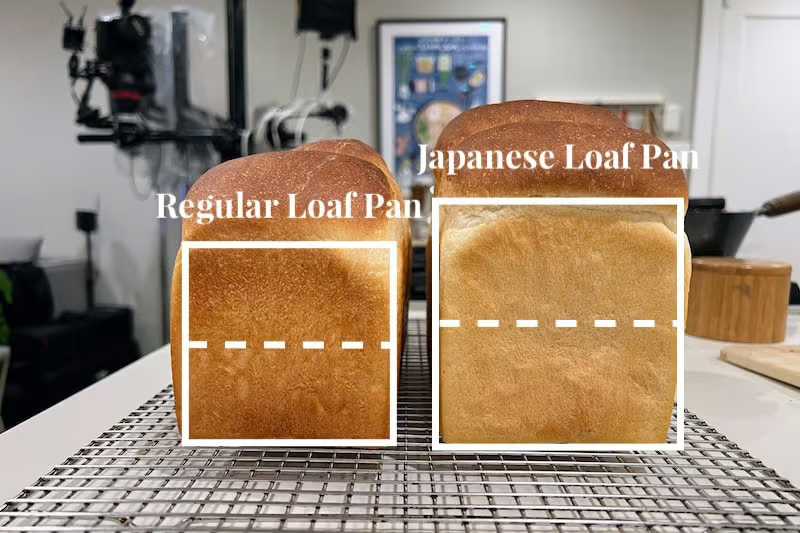
Most shokupan loaf pans available in the US are too small for authentic Japanese milk bread or sandwiches (sando). For years, the only option was importing one from Japan—and that always bothered me.

How to Make Shokupan (Japanese Milk Bread)
Here’s the 5-step process overview for the shokupan recipe.
I highly recommend reading the recipe card below for details: Make & knead the dough. Combine water, sugar, honey, and yeast, then mix with flour, salt, and milk powder.
Show 4 more media items
Kneading
Control your water temperature – Friction from high-speed kneading raises the dough temperature, so adjust your starting water temperature to match your kitchen.
Use lukewarm water in a cool kitchen, cold water in a moderate kitchen, and refrigerator-cold water in a warm kitchen. Your goal is 79–82ºF (26–28ºC) when kneading is completed.
Proofing
Create a warm spot for proofing – The ideal proofing temperature is 86–100°F (30–38°C).
If your oven has no proof setting, see the Notes section in the recipe card for easy alternatives. Avoid extreme heat and direct sunlight – Below 86°F (30°C), fermentation slows or stalls.

Shaping
Go easy on the flour when shaping – Use no more than 2 tsp of bread flour for the entire shaping process.
Too much flour prevents the dough from gripping the surface and can dry out the loaf. Keep the surface smooth and taut – Drag the dough toward you on a non-floured surface.
Baking
Lower the oven temperature before baking – Preheat to 425°F (220°C), then lower to 385–410°F (195–210°C) just before the loaf goes in.
The initial blast of heat gives the dough a strong oven spring. Position the rack carefully – Place the rack so the top of the loaf pan sits 6–7 inches (15–18 cm) from the top heating element.
Notes: Stand mixer adjustments
This recipe is optimized for a KitchenAid Artisan Series 5-Qt Stand Mixer (350W).
If using a different model, adjust as follows: KitchenAid Classic (275W): Do not double the recipe; the motor is not powerful enough for the heavy dough. Professional Series (Spiral Hook): You must double the recipe to engage the hook.
Source video
Source video
Method Timeline
Prep
ActivePrep
1 hr
Prep time from the source recipe card.
Cook
ActiveCook
30 min
Cook time from the source recipe card.
Total
PassiveTotal
4 hr
Total time from the source recipe card.
Step 1
Gather all your ingredients and weigh them with a digital scale—accuracy is the secret to consistent bread. Water temperature is the one variable you can control before mixing begins. High-speed kneading generates significant friction heat—so starting with cooler water helps keep your dough from overheating. Use this as a starting point based on your kitchen temperature: Very cold kitchen → room-temp water, 68–76°F (20–24°C) Cool kitchen → slightly cool water, 65–68°F (18–20°C) Moderate kitchen → cold water, 61–65°F (16–18°C) Warm to hot kitchen → very cold water, 54–61°F (12–16°C) Bake a few loaves, check your dough temperature after kneading, and adjust water temperature up or down by a few degrees until you consistently hit 79–82°F (26–28°C). In my San Francisco kitchen, I typically use filtered tap water between 67–68°F (18–20°C)—a good starting point to reach the ideal final dough temperature.

Image detailsGather all your ingredients and weigh them with a digital scale—accuracy is the secret to consistent bread. Water temperature is the one variable you can control before mixing begins. High-speed kneading generates significant friction heat—so starting with cooler water helps keep your dough from overheating. Use this as a starting point based on your kitchen temperature:Very cold kitchen → room-temp water, 68–76°F (20–24°C)Cool kitchen → slightly cool water, 65–68°F (18–20°C)Moderate kitchen → cold water, 61–65°F (16–18°C)Warm to hot kitchen → very cold water, 54–61°F (12–16°C)Bake a few loaves, check your dough temperature after kneading, and adjust water temperature up or down by a few degrees until you consistently hit 79–82°F (26–28°C).In my San Francisco kitchen, I typically use filtered tap water between 67–68°F (18–20°C)—a good starting point to reach the ideal final dough temperature.Just One Cookbook · Shokupan (Japanese Milk Bread) (Video) 食パンDev reference Visual cue
until you consistently hit 79–82°F (26–28°C).
Checks4
TemperatureInfoTemperature76°F
Target: 76 degree-fahrenheit
Expected state: Use this as a starting point based on your kitchen temperature: Very cold kitchen → room-temp water, 68–76°F (20–24°C) Cool kitchen → slightly cool water, 65–68°F (18–20°C) Moderate kitchen → cold water, 61–65°F (16–18°C) Warm to hot kitchen → very cold water, 54–61°F (12–16°C) Bake a few loaves, check your dough temperature after kneading, and adjust water temperature up or down by a few degrees until you consistently hit 79–82°F (26–28°C).
TemperatureInfoTemperature68°F
Target: 68 degree-fahrenheit
Expected state: Use this as a starting point based on your kitchen temperature: Very cold kitchen → room-temp water, 68–76°F (20–24°C) Cool kitchen → slightly cool water, 65–68°F (18–20°C) Moderate kitchen → cold water, 61–65°F (16–18°C) Warm to hot kitchen → very cold water, 54–61°F (12–16°C) Bake a few loaves, check your dough temperature after kneading, and adjust water temperature up or down by a few degrees until you consistently hit 79–82°F (26–28°C).
Visual cueInfoVisualuntil you consistently hit 79–82°F (26–28°C).
Expected state: until you consistently hit 79–82°F (26–28°C).
HoldingMain recipeSource holding instruction
Gather all your ingredients and weigh them with a digital scale—accuracy is the secret to consistent bread. Water temperature is the one variable you can control before mixing begins. High-speed kneading generates significant friction heat—so starting with cooler water helps keep your dough from overheating. Use this as a starting point based on your kitchen temperature: Very cold kitchen → room-temp water, 68–76°F (20–24°C) Cool kitchen → slightly cool water, 65–68°F (18–20°C) Moderate kitchen → cold water, 61–65°F (16–18°C) Warm to hot kitchen → very cold water, 54–61°F (12–16°C) Bake a few loaves, check your dough temperature after kneading, and adjust water temperature up or down by a few degrees until you consistently hit 79–82°F (26–28°C). In my San Francisco kitchen, I typically use filtered tap water between 67–68°F (18–20°C)—a good starting point to reach the ideal final dough temperature.
Troubleshooting2
CautionDough Slack And GooeyStep 1 · Step 1Dough Slack And Gooey
If the dough suddenly turns slack and gooey, the gluten has collapsed from overheating—and it cannot be saved.
If the dough suddenly turns slack and gooey, the gluten has collapsed from overheating—and it cannot be saved.
Prevention
Start with cooler water—see the DDT FAQ above. Stop the mixer the moment the dough clings to the hook and clears the bowl. That’s your cue for the Windowpane Test. Stay with your mixer during high-speed kneading. The dough can overheat quickly.
Recovery
If the dough suddenly turns slack and gooey, the gluten has collapsed from overheating—and it cannot be saved. High-speed kneading generates significant friction heat. Stay with your mixer during high-speed kneading.
CautionCrumb Gummy Or UndercookedStep 1 · Step 1Crumb Gummy Or Undercooked
A gummy crumb means the inside didn’t set properly during baking.
Under-baked – The internal temperature should reach 190–200°F (88–93°C). If the crust looks golden but the inside is gummy, bake longer. Every oven runs differently—use an instant-read thermometer to check. Sliced too soon – Cool completely for 2–3 hours before slicing. Cutting in too early releases steam and leaves the crumb gummy. Over-proofed – Over-proofed dough can collapse slightly in the oven, leaving a dense, gummy interior. Oven temperature too low – Use an oven thermometer to verify your oven’s actual temperature.
Prevention
Here are the most likely causes: Under-baked – The internal temperature should reach 190–200°F (88–93°C). Every oven runs differently—use an instant-read thermometer to check. Sliced too soon – Cool completely for 2–3 hours before slicing. Oven temperature too low – Use an oven thermometer to verify your oven’s actual temperature.
Recovery
If the crust looks golden but the inside is gummy, bake longer. Sliced too soon – Cool completely for 2–3 hours before slicing.
Inputs and tools1
Uses
- 275 g water ((determine water temp; see Step 1))
Why and source
This step has reviewed source-backed guidance.
Step 2
In a large glass bowl, combine 275 g water, 22 g sugar, and 11 g honey. Nami’s Tip: I recommend using a large, straight-sided glass bowl for proofing. The straight sides encourage the dough to rise upward rather than outward, while the clear glass allows you to monitor the fermentation bubbles and easily track when the dough has truly doubled in size.

Image detailsIn a large glass bowl, combine 275 g water, 22 g sugar, and 11 g honey.Nami’s Tip: I recommend using a large, straight-sided glass bowl for proofing. The straight sides encourage the dough to rise upward rather than outward, while the clear glass allows you to monitor the fermentation bubbles and easily track when the dough has truly doubled in size.Just One Cookbook · Shokupan (Japanese Milk Bread) (Video) 食パンDev reference Inputs and tools2
Uses
- 22 g sugar
- 11 g honey
Step 3
Whisk in 8 g instant yeast and set aside. Note: If substituting with active dry yeast, combine it with warm water (100–110°F / 38–43°C) and set it in a warm place for 10 minutes until foamy. If no foam appears, your yeast is likely inactive—start fresh to avoid a heavy, dense loaf.

Image detailsWhisk in 8 g instant yeast and set aside. Note: If substituting with active dry yeast, combine it with warm water (100–110°F / 38–43°C) and set it in a warm place for 10 minutes until foamy. If no foam appears, your yeast is likely inactive—start fresh to avoid a heavy, dense loaf.Just One Cookbook · Shokupan (Japanese Milk Bread) (Video) 食パンDev reference Visual cue
until foamy.
Checks3
TemperatureInfoTemperature110°F
Target: 110 degree-fahrenheit
Expected state: Note: If substituting with active dry yeast, combine it with warm water (100–110°F / 38–43°C) and set it in a warm place for 10 minutes until foamy.
Visual cueInfoVisualuntil foamy.
Expected state: until foamy.
TimingInfoTimingfor 10 minutes
Target: 10 minute
Expected state: Note: If substituting with active dry yeast, combine it with warm water (100–110°F / 38–43°C) and set it in a warm place for 10 minutes until foamy.
Troubleshooting1
CautionDough Does Not RiseStep 3 · Step 3Dough Rising
There are a few common culprits. Check these before troubleshooting further: Old yeast – Never use yeast older than 6 months.
. Check these before troubleshooting further: Old yeast – Never use yeast older than 6 months. When in doubt, start with a fresh packet. Mismeasured ingredients –Too much salt, sugar, or flour inhibits yeast. Always weigh with a digital scale. Dough dried out – Cover tightly with plastic wrap. A surface crust prevents the dough from rising. Dough too cold or too hot – Yeast is most active at 86–95°F (30–35°C). See the warm environment tip above.
Prevention
Check these before troubleshooting further: Old yeast – Never use yeast older than 6 months. When in doubt, start with a fresh packet. Always weigh with a digital scale. Dough dried out – Cover tightly with plastic wrap. A surface crust prevents the dough from rising.
Inputs and tools1
Uses
- 8 g instant yeast
Why and source
This step has reviewed source-backed guidance.
Step 4
To the bowl of a stand mixer, add 385 g bread flour, 8 g Diamond Crystal kosher salt, and 22 g skim milk powder or nonfat dry milk powder. Mix until well-combined, then form a well in the center of the dry ingredients.

Image detailsTo the bowl of a stand mixer, add 385 g bread flour, 8 g Diamond Crystal kosher salt, and 22 g skim milk powder or nonfat dry milk powder. Mix until well-combined, then form a well in the center of the dry ingredients.Just One Cookbook · Shokupan (Japanese Milk Bread) (Video) 食パンDev reference Visual cue
until well-combined, then form a well in the center of the dry ingredients.
Checks1
TextureInfoTextureuntil well-combined, then form a well in the center of the dry ingredients.
Expected state: until well-combined, then form a well in the center of the dry ingredients.
Inputs and tools3
Uses
- 385 g bread flour
- 8 g Diamond Crystal kosher salt
- 22 g skim milk powder or nonfat dry milk powder
Why and source
This step has reviewed source-backed guidance.
Step 5
Pour the yeast mixture into the well, scraping out every last drop. Fit the stand mixer with the dough hook and lock the bowl into place. Note: Set the empty glass bowl aside—you’ll use it to proof the dough later.
Step 6
Knead on SPEED 2 for 2–3 minutes, until a shaggy dough forms. Ensure all the flour is fully incorporated and no dry patches remain.

Image detailsKnead on SPEED 2 for 2–3 minutes, until a shaggy dough forms. Ensure all the flour is fully incorporated and no dry patches remain.Just One Cookbook · Shokupan (Japanese Milk Bread) (Video) 食パンDev reference Visual cue
until a shaggy dough forms.
Checks2
Visual cueInfoVisualuntil a shaggy dough forms.
Expected state: until a shaggy dough forms.
TimingInfoTimingfor 2–3 minutes
Target: 2-3 minute
Expected state: Knead on SPEED 2 for 2–3 minutes, until a shaggy dough forms.
Why and source
This step has reviewed source-backed guidance.
Step 7
Increase to SPEED 4 and knead for 4 minutes. The dough should begin to transition from shaggy to smooth, but will still look slightly rough and bumpy at this stage.

Image detailsIncrease to SPEED 4 and knead for 4 minutes. The dough should begin to transition from shaggy to smooth, but will still look slightly rough and bumpy at this stage.Just One Cookbook · Shokupan (Japanese Milk Bread) (Video) 食パンDev reference Checks1
TimingInfoTimingfor 4 minutes
Target: 4 minute
Expected state: Increase to SPEED 4 and knead for 4 minutes.
Why and source
This step has reviewed source-backed guidance.
Step 8
Increase to SPEED 6 and knead for 3 minutes, or until the dough clears the sides of the bowl. Don't leave your mixer! The machine will shake and may “walk” across the counter. Keep both hands on the mixer at all times to hold it steady. At this stage, the dough should look noticeably smoother and show clear signs of gluten development, though it won’t be fully elastic yet.

Image detailsIncrease to SPEED 6 and knead for 3 minutes, or until the dough clears the sides of the bowl. Don't leave your mixer! The machine will shake and may “walk” across the counter. Keep both hands on the mixer at all times to hold it steady.At this stage, the dough should look noticeably smoother and show clear signs of gluten development, though it won’t be fully elastic yet.Just One Cookbook · Shokupan (Japanese Milk Bread) (Video) 食パンDev reference Visual cue
until the dough clears the sides of the bowl.
Checks2
Visual cueInfoVisualuntil the dough clears the sides of the bowl.
Expected state: until the dough clears the sides of the bowl.
TimingInfoTimingfor 3 minutes
Target: 3 minute
Expected state: Increase to SPEED 6 and knead for 3 minutes, or until the dough clears the sides of the bowl.
Why and source
This step has reviewed source-backed guidance.
Step 9
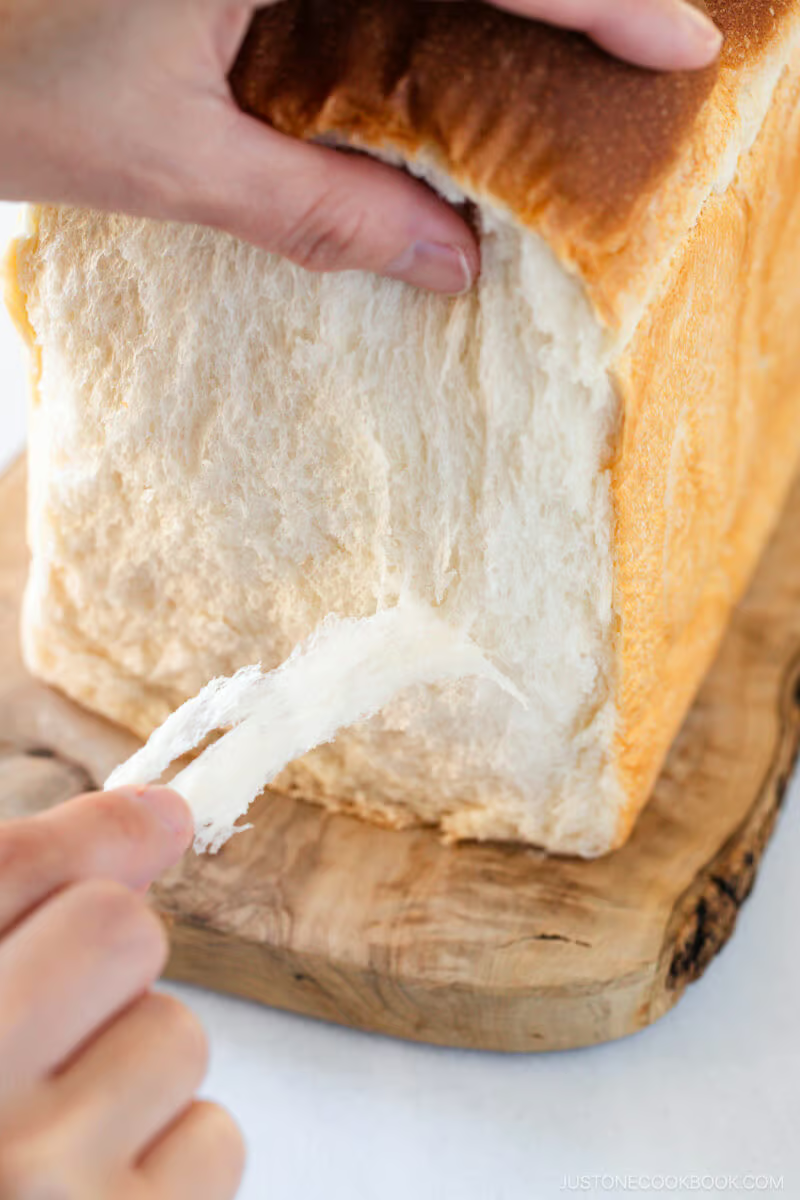
Add 28 g unsalted butter (cut into small cubes for faster incorporation). Nami’s Tip: Check your dough temperature before adding butter—it should be below 79°F/26°C. In summer, use cold butter to help keep the dough cool and prevent overheating (cold butter can bring the dough temp down to ~77°F/25°C); use room temperature in winter. Why add butter last? Butter coats the flour and slows gluten development, so always wait until the dough is smooth and pulls cleanly from the bowl before adding it—this is the secret to shokupan's pillowy, pull-apart texture.

Image detailsAdd 28 g unsalted butter (cut into small cubes for faster incorporation). Nami’s Tip: Check your dough temperature before adding butter—it should be below 79°F/26°C. In summer, use cold butter to help keep the dough cool and prevent overheating (cold butter can bring the dough temp down to ~77°F/25°C); use room temperature in winter.Why add butter last? Butter coats the flour and slows gluten development, so always wait until the dough is smooth and pulls cleanly from the bowl before adding it—this is the secret to shokupan's pillowy, pull-apart texture.Just One Cookbook · Shokupan (Japanese Milk Bread) (Video) 食パンDev reference Visual cue
until the dough is smooth and pulls cleanly from the bowl before adding it—this is the secret to shokupan's pillowy, pull-apart texture.
Checks4
TemperatureInfoTemperature79°F
Target: 79 degree-fahrenheit
Expected state: Nami’s Tip: Check your dough temperature before adding butter—it should be below 79°F/26°C.
TemperatureInfoTemperature77°F
Target: 77 degree-fahrenheit
Expected state: In summer, use cold butter to help keep the dough cool and prevent overheating (cold butter can bring the dough temp down to ~77°F/25°C); use room temperature in winter.
TextureInfoTextureuntil the dough is smooth and pulls cleanly from the bowl before adding it—this is the secret to shokupan's pillowy, pull-apart texture.
Expected state: until the dough is smooth and pulls cleanly from the bowl before adding it—this is the secret to shokupan's pillowy, pull-apart texture.
HoldingMain recipeSource holding instruction
Add 28 g unsalted butter (cut into small cubes for faster incorporation). Nami’s Tip: Check your dough temperature before adding butter—it should be below 79°F/26°C. In summer, use cold butter to help keep the dough cool and prevent overheating (cold butter can bring the dough temp down to ~77°F/25°C); use room temperature in winter. Why add butter last? Butter coats the flour and slows gluten development, so always wait until the dough is smooth and pulls cleanly from the bowl before adding it—this is the secret to shokupan's pillowy, pull-apart texture.
Troubleshooting1
CautionLoaf Dense And HeavyStep 9 · Step 9Loaf Dense And Heavy
A dense, heavy loaf usually means the dough didn’t develop or rise properly.
the dough didn’t develop or rise properly. Here are the most likely causes: Under-kneaded – The gluten wasn’t strong enough to trap the gas. Always knead until the dough passes the Windowpane Test. Old or inactive yeast – Use yeast within 6 months and store it in the freezer. Old yeast won’t generate enough gas to lift the dough. Under-proofed – The dough needs to fully double during bulk fermentation. Give it more time in a warm spot. Too much flour – Always weigh with a digital scale. Never scoop. Butter added too early – Always wait until the dough clears the bowl before adding butter.
Prevention
Here are the most likely causes: Under-kneaded – The gluten wasn’t strong enough to trap the gas. Always knead until the dough passes the Windowpane Test. Old or inactive yeast – Use yeast within 6 months and store it in the freezer. Give it more time in a warm spot. Too much flour – Always weigh with a digital scale. Butter added too early – Always wait until the dough clears the bowl before adding butter.
Recovery
Here are the most likely causes: Under-kneaded – The gluten wasn’t strong enough to trap the gas. Always knead until the dough passes the Windowpane Test. Butter added too early – Always wait until the dough clears the bowl before adding butter.
Inputs and tools2
Uses
- 28 g unsalted butter ((at room temp in winter and cold in summer; for vegan, see Notes) )
- 10 g unsalted butter ((for the loaf pan))
Why and source
This step has reviewed source-backed guidance.
Step 10
Knead on SPEED 2 for 2 minutes, or until no butter streaks remain in the dough.

Image detailsKnead on SPEED 2 for 2 minutes, or until no butter streaks remain in the dough.Just One Cookbook · Shokupan (Japanese Milk Bread) (Video) 食パンDev reference Visual cue
until no butter streaks remain in the dough.
Checks2
Visual cueInfoVisualuntil no butter streaks remain in the dough.
Expected state: until no butter streaks remain in the dough.
TimingInfoTimingfor 2 minutes
Target: 2 minute
Expected state: Knead on SPEED 2 for 2 minutes, or until no butter streaks remain in the dough.
Why and source
This step has reviewed source-backed guidance.
Step 11
*READ BEFORE NEXT STAGE*Watch for the visual cue: If the dough comes together into one piece and clings to the hook, leaving the bowl completely clean, perform the Windowpane Test immediately. The goal is a smooth, strong, elastic dough. Watch closely for friction heat! If the dough exceeds 82°F (28°C), the gluten will collapse into a slack, gooey mess that cannot be saved. To avoid this, stop the mixer the moment you see the visual cue.
Step 12
Increase to SPEED 6 and knead for 2–3 minutes. Don't leave your mixer! The machine will shake and may “walk” across the counter. Keep both hands on the mixer at all times to hold it steady.

Image detailsIncrease to SPEED 6 and knead for 2–3 minutes. Don't leave your mixer! The machine will shake and may “walk” across the counter. Keep both hands on the mixer at all times to hold it steady.Just One Cookbook · Shokupan (Japanese Milk Bread) (Video) 食パンDev reference Checks1
TimingInfoTimingfor 2–3 minutes
Target: 2-3 minute
Expected state: Increase to SPEED 6 and knead for 2–3 minutes.
Why and source
This step has reviewed source-backed guidance.
Step 13
At the 2-minute mark, stop and lift the hook. If the dough comes together into one piece and clings to the hook, you are ready for the Windowpane Test. Otherwise, keep kneading on SPEED 6.
Step 14
At the 3-minute mark, stop and lift the hook. If the dough clings to the hook, do the Windowpane Test. If the dough doesn’t cling, knead for additional 30–60 seconds and check. Nami’s Tip: See the FAQ if your dough is slack and gooey or if it’s taking too long to pass the windowpane test. My dough usually clings to the hook around the 2–3 minute mark.

Image detailsAt the 3-minute mark, stop and lift the hook. If the dough clings to the hook, do the Windowpane Test. If the dough doesn’t cling, knead for additional 30–60 seconds and check.Nami’s Tip: See the FAQ if your dough is slack and gooey or if it’s taking too long to pass the windowpane test. My dough usually clings to the hook around the 2–3 minute mark.Just One Cookbook · Shokupan (Japanese Milk Bread) (Video) 食パンDev reference Checks1
TimingInfoTimingadditional 30–60 seconds
Target: 1 minute
Expected state: If the dough doesn’t cling, knead for additional 30–60 seconds and check.
Why and source
This step has reviewed source-backed guidance.
Step 15
Tear off a small piece of dough and gently stretch it into a square. Pass if it forms a thin, translucent membrane without tearing. Fail if it breaks; continue kneading on SPEED 6 for 1 more minute and re-test.

Image detailsTear off a small piece of dough and gently stretch it into a square. Pass if it forms a thin, translucent membrane without tearing. Fail if it breaks; continue kneading on SPEED 6 for 1 more minute and re-test.Just One Cookbook · Shokupan (Japanese Milk Bread) (Video) 食パンDev reference Troubleshooting1
CautionDough Does Not Pass the Windowpane TestStep 15 · Step 15Dough Pass The Windowpane Test
If the dough tears instead of stretching into a thin, translucent membrane, the gluten isn’t fully developed.
Under-kneaded – Knead for 1 more minute on Speed 6 and test again. Repeat until it passes. Butter added too early – Always wait until the dough is smooth and clears the bowl before adding butter. Fat blocks gluten from forming. Dough too cold – Cold dough is stiff and resists stretching. It may simply need extra kneading time.
Prevention
Here are the most likely causes: Under-kneaded – Knead for 1 more minute on Speed 6 and test again. Butter added too early – Always wait until the dough is smooth and clears the bowl before adding butter. Dough too cold – Cold dough is stiff and resists stretching.
Recovery
Here are the most likely causes: Under-kneaded – Knead for 1 more minute on Speed 6 and test again. Repeat until it passes. Butter added too early – Always wait until the dough is smooth and clears the bowl before adding butter. It may simply need extra kneading time.
Step 16
Knead on SPEED 4 for 1–2 minutes. This “relaxes” the dough and smooths the surface after the high-speed work. Nami's Tip: If you're afraid of overkneading, skip the full 1–2 minutes—but do knead gently for just a few seconds before finishing.

Image detailsKnead on SPEED 4 for 1–2 minutes. This “relaxes” the dough and smooths the surface after the high-speed work. Nami's Tip: If you're afraid of overkneading, skip the full 1–2 minutes—but do knead gently for just a few seconds before finishing.Just One Cookbook · Shokupan (Japanese Milk Bread) (Video) 食パンDev reference Checks1
TimingInfoTimingfor 1–2 minutes
Target: 1-2 minute
Expected state: Knead on SPEED 4 for 1–2 minutes.
Why and source
This step has reviewed source-backed guidance.
Step 17
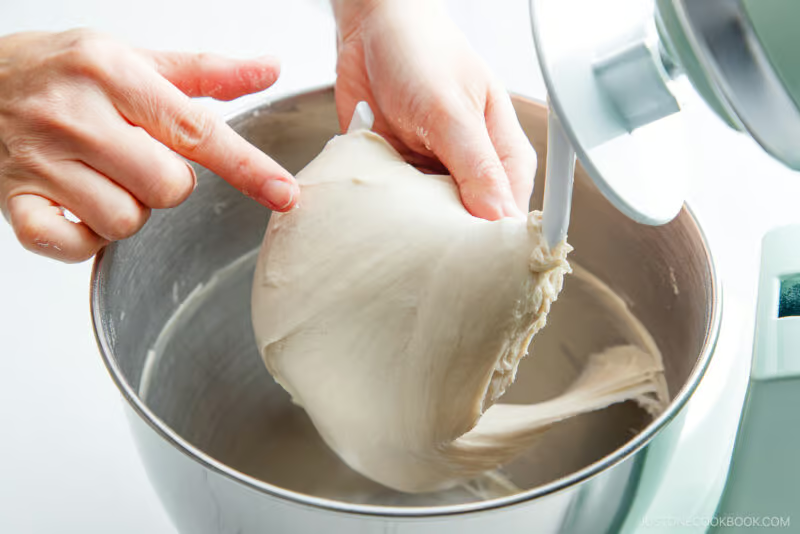
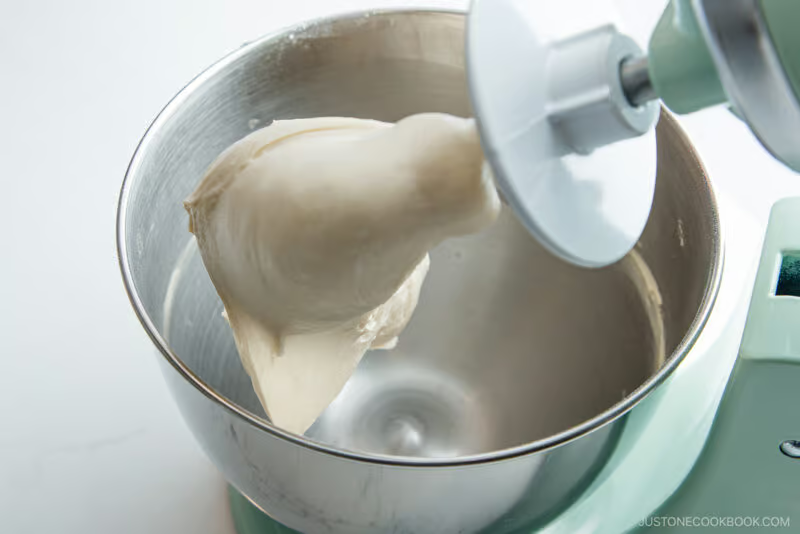
When you lift the hook, the dough should gather in one piece, separating easily from the bowl. The dough should feel soft and smooth with a shiny, silky finish. Remove the dough from the hook. Nami’s Tip: Check the dough temperature. Insert an instant-read thermometer into the center of the dough. It should read 79–82°F (26–28°C). If it's too warm, rest the dough in the fridge for 15 minutes.

Image detailsWhen you lift the hook, the dough should gather in one piece, separating easily from the bowl. The dough should feel soft and smooth with a shiny, silky finish. Remove the dough from the hook. Nami’s Tip: Check the dough temperature. Insert an instant-read thermometer into the center of the dough. It should read 79–82°F (26–28°C). If it's too warm, rest the dough in the fridge for 15 minutes.Just One Cookbook · Shokupan (Japanese Milk Bread) (Video) 食パンDev reference Checks3
TemperatureInfoTemperature82°F
Target: 82 degree-fahrenheit
Expected state: It should read 79–82°F (26–28°C).
TimingInfoTimingfor 15 minutes
Target: 15 minute
Expected state: If it's too warm, rest the dough in the fridge for 15 minutes.
HoldingMain recipeSource holding instruction
When you lift the hook, the dough should gather in one piece, separating easily from the bowl. The dough should feel soft and smooth with a shiny, silky finish. Remove the dough from the hook. Nami’s Tip: Check the dough temperature. Insert an instant-read thermometer into the center of the dough. It should read 79–82°F (26–28°C). If it's too warm, rest the dough in the fridge for 15 minutes.
Why and source
This step has reviewed source-backed guidance.
Step 18
Lightly dust your work surface. Thinly coat the reserved bowl with ½ tsp neutral oil. Wipe off any excess oil from the bowl and your fingers with a paper towel. Nami’s Tip: I fill my flour duster with 2 tsp bread flour for dusting. Don’t use more than this, or you’ll risk a dry loaf.

Image detailsLightly dust your work surface. Thinly coat the reserved bowl with ½ tsp neutral oil. Wipe off any excess oil from the bowl and your fingers with a paper towel. Nami’s Tip: I fill my flour duster with 2 tsp bread flour for dusting. Don’t use more than this, or you’ll risk a dry loaf.Just One Cookbook · Shokupan (Japanese Milk Bread) (Video) 食パンDev reference Inputs and tools1
Uses
- ½ tsp neutral oil ((for the bowl))
Step 19
Use a flexible dough scraper to transfer the dough to your work surface. Fold the dough over itself so the smooth side faces up. Tuck the edges underneath to form a smooth oval, then scoop it up with both hands—keeping the smooth side up at all times.
Step 20
Slam and Fold: Hold the dough by the far edge and slam the smooth side firmly onto the work surface—bang! Fold the bottom edge up and away from you, then tuck the sides underneath to form a smooth, rounded shape. Scoop it up with both hands, keeping the smooth side up at all times.
Step 21
Repetition: Repeat the slam, fold, and tuck 5 times total, until the dough forms a taut, smooth ball.

Image detailsRepetition: Repeat the slam, fold, and tuck 5 times total, until the dough forms a taut, smooth ball.Just One Cookbook · Shokupan (Japanese Milk Bread) (Video) 食パンDev reference Visual cue
until the dough forms a taut, smooth ball.
Checks1
TextureInfoTextureuntil the dough forms a taut, smooth ball.
Expected state: until the dough forms a taut, smooth ball.
Why and source
This step has reviewed source-backed guidance.
Step 22
Tension Pulling: Cup both hands around the dough and gently drag it toward you, tucking the bottom under to create surface tension. Rotate the dough slightly and repeat until it is perfectly smooth and taut.

Image detailsTension Pulling: Cup both hands around the dough and gently drag it toward you, tucking the bottom under to create surface tension. Rotate the dough slightly and repeat until it is perfectly smooth and taut.Just One Cookbook · Shokupan (Japanese Milk Bread) (Video) 食パンDev reference Visual cue
until it is perfectly smooth and taut.
Checks1
TextureInfoTextureuntil it is perfectly smooth and taut.
Expected state: until it is perfectly smooth and taut.
Troubleshooting1
CautionDough Loses Its Smooth Skin During ShapingStep 22 · Step 22Dough Lose Its Smooth Skin During Shaping
The smooth skin is fragile—once it breaks, it’s hard to recover.
Dough sticking to the work surface – If the dough sticks, lift it gently with a dough scraper. Never pull it—pulling breaks the skin. Too much flour on the work surface – Excess flour prevents the dough from gripping properly during tension pulling, making it harder to form a smooth, taut skin. Skipped or shortened bench rest – If the dough springs back while rolling, it needs more rest. Cover and wait 2–3 minutes before trying again. Never force it. Rolling too tightly – Roll the log slowly with gentle, even tension. Too much force ruptures the skin.
Prevention
The smooth skin is fragile—once it breaks, it’s hard to recover. Here are the most likely causes: Dough sticking to the work surface – If the dough sticks, lift it gently with a dough scraper. Never pull it—pulling breaks the skin. Too much flour on the work surface – Excess flour prevents the dough from gripping properly during tension pulling, making it harder to form a smooth, taut skin. Cover and wait 2–3 minutes before trying again.
Recovery
The smooth skin is fragile—once it breaks, it’s hard to recover. Cover and wait 2–3 minutes before trying again.
Why and source
This step has reviewed source-backed guidance.
Step 23
Final Step: Gently pick up the dough, transfer it to the greased bowl, and cover with plastic.
Step 24
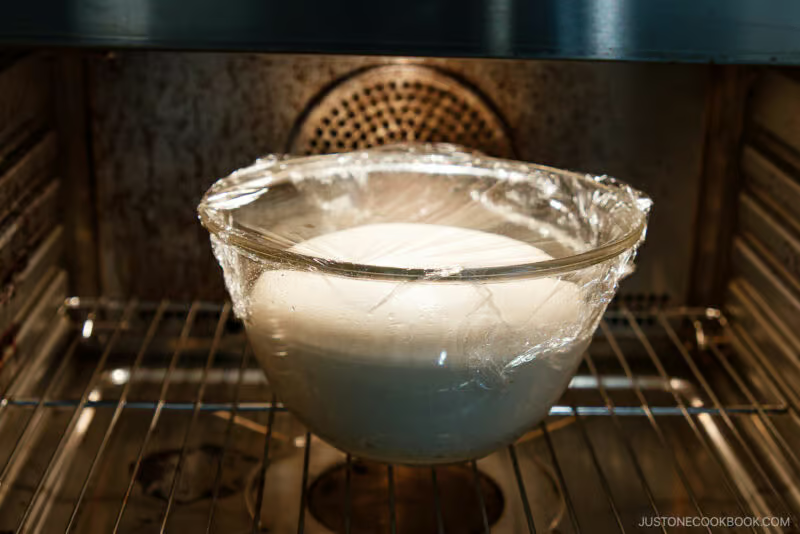
Place the bowl in a warm spot until the dough doubles in size. This typically takes 45–60 minutes, though it may take up to 1.5 hours in a cool kitchen. Nami's Tip: Halfway through, if the dough looks flat, gently reshape it into a tall dome without deflating the air.

Image detailsPlace the bowl in a warm spot until the dough doubles in size. This typically takes 45–60 minutes, though it may take up to 1.5 hours in a cool kitchen.Nami's Tip: Halfway through, if the dough looks flat, gently reshape it into a tall dome without deflating the air.Just One Cookbook · Shokupan (Japanese Milk Bread) (Video) 食パンDev reference Visual cue
until the dough doubles in size.
Checks3
Visual cueInfoVisualuntil the dough doubles in size.
Expected state: until the dough doubles in size.
TimingInfoTiming45–60 minutes
Target: 45-60 minute
Expected state: This typically takes 45–60 minutes, though it may take up to 1.5 hours in a cool kitchen.
HoldingMain recipeSource holding instruction
Place the bowl in a warm spot until the dough doubles in size. This typically takes 45–60 minutes, though it may take up to 1.5 hours in a cool kitchen. Nami's Tip: Halfway through, if the dough looks flat, gently reshape it into a tall dome without deflating the air.
Troubleshooting1
CautionJapanese Milk Bread Has a Coarse CrumbStep 24 · Step 24Japanese Milk Bread Loaf Have A Coarse Crumb
A coarse crumb looks rough and sponge-like, with a strong yeast smell and a loaf that didn’t rise well.
Over-proofed during bulk fermentation – The dough rose too fast, often because the kitchen was too warm. Monitor the dough closely, especially in summer. Dough temperature too high – If the dough gets too warm during kneading, it weakens or kills the yeast. Use cooler water in warm weather and refrigerate your flour and mixing bowl if needed. Over-kneaded – Once the dough is smooth, shiny, and passes the Windowpane Test, stop. Continuing breaks down the gluten, leaving the dough slack with no structure.
Prevention
Here are the most likely causes: Over-proofed during bulk fermentation – The dough rose too fast, often because the kitchen was too warm. Monitor the dough closely, especially in summer. Use cooler water in warm weather and refrigerate your flour and mixing bowl if needed. Over-kneaded – Once the dough is smooth, shiny, and passes the Windowpane Test, stop.
Recovery
Dough temperature too high – If the dough gets too warm during kneading, it weakens or kills the yeast. Over-kneaded – Once the dough is smooth, shiny, and passes the Windowpane Test, stop.
Why and source
This step has reviewed source-backed guidance.
Step 25
Dust a little flour on the dough and poke the center with your index finger. If the indentation remains or springs back very slowly, the dough is ready. If it springs back immediately or feels tight, let it proof longer and test again.
Step 26
Turn the bowl upside down to release the dough onto your work surface. Gently press down with your fingers to deflate the air. Nami's Tip: Keep track of the smooth side—place it facing down at this stage.
Step 27
Gather the edges into the center and place the dough on the digital scale. Weigh the total, then use the dough scraper to divide it into 3 equal pieces.
Step 28
If a piece is too large, pinch or cut a bit from the edge and press it onto the cut edge of the smaller piece, keeping the smooth surface intact.
Step 29
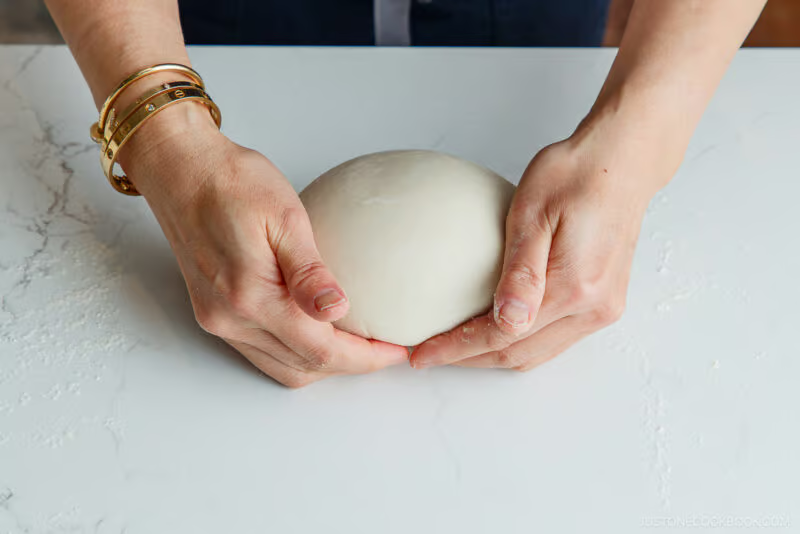
Hold the dough smooth side up. Using both hands, gently pull the dough down on two opposite sides to begin rounding. Rotate 90 degrees and repeat on the remaining sides to complete the smooth boule.
Step 30
Place the dough on a non-floured surface. Drag it 2 inches (5 cm) toward you, rotate a quarter turn, and drag again—6 times total—until smooth and taut (see video). Apply the same tension to each piece to ensure an even rise. Repeat with the remaining pieces. Nami's Tip: You need the friction of a non-floured surface to pull the skin tight. If it slides too easily, it won’t get taut.

Image detailsPlace the dough on a non-floured surface. Drag it 2 inches (5 cm) toward you, rotate a quarter turn, and drag again—6 times total—until smooth and taut (see video). Apply the same tension to each piece to ensure an even rise. Repeat with the remaining pieces. Nami's Tip: You need the friction of a non-floured surface to pull the skin tight. If it slides too easily, it won’t get taut.Just One Cookbook · Shokupan (Japanese Milk Bread) (Video) 食パンDev reference Visual cue
until smooth and taut (see video).
Checks1
TextureInfoTextureuntil smooth and taut (see video).
Expected state: until smooth and taut (see video).
Troubleshooting1
CautionDough Pieces Rising Unevenly In The Loaf PanStep 30 · Step 30Dough Pieces Rising Unevenly In The Loaf Pan
Uneven rising means one or two pieces are taller than the others before baking.
Uneven tension during shaping – Apply the same tension to all 3 logs. A tighter roll rises faster. Uneven dough weight – Always weigh each piece on a digital scale. Unequal pieces rise at different rates. One piece placed later than the others – Work quickly when shaping, or the first log in the loaf pan will have a head start. Uneven proofing environment – Place the loaf pan in the center of your warm spot, away from direct heat sources.
Prevention
Here are the most likely causes: Uneven tension during shaping – Apply the same tension to all 3 logs. Uneven dough weight – Always weigh each piece on a digital scale.
Why and source
This step has reviewed source-backed guidance.
Step 31
Cover the dough balls with a lightly misted tea towel and rest for 15 minutes. The dough should feel much softer and more pliable afterward. Nami’s Tip: Wring out your damp towel well before covering. A heavy, wet towel can weigh down the dough and ruin its shape.

Image detailsCover the dough balls with a lightly misted tea towel and rest for 15 minutes. The dough should feel much softer and more pliable afterward.Nami’s Tip: Wring out your damp towel well before covering. A heavy, wet towel can weigh down the dough and ruin its shape.Just One Cookbook · Shokupan (Japanese Milk Bread) (Video) 食パンDev reference Checks2
TimingInfoTimingfor 15 minutes
Target: 15 minute
Expected state: Cover the dough balls with a lightly misted tea towel and rest for 15 minutes.
HoldingMain recipeSource holding instruction
Cover the dough balls with a lightly misted tea towel and rest for 15 minutes. The dough should feel much softer and more pliable afterward. Nami’s Tip: Wring out your damp towel well before covering. A heavy, wet towel can weigh down the dough and ruin its shape.
Why and source
This step has reviewed source-backed guidance.
Step 32
Grease the shokupan loaf pan and lid with 10 g unsalted butter (room temp). Apply a thin, even coating, paying extra attention to the corners.
Step 33
Take out one dough ball, keeping the others covered. Lightly flour the work surface and top of the dough—just enough to prevent sticking. Place the rolling pin in the center of the dough and press down. Nami's Tip: Use flour sparingly. If the dough slides rather than grips the surface while rolling, you’ve used too much flour.
Step 34
Roll from the center toward the top edge and the bottom edge. This is to release the gas. Nami’s Tip: If the dough springs back or shrinks, it needs more rest. Cover and wait 2–3 minutes. Never force it—forcing the dough can cause the log to unravel or tear during baking.

Image detailsRoll from the center toward the top edge and the bottom edge. This is to release the gas. Nami’s Tip: If the dough springs back or shrinks, it needs more rest. Cover and wait 2–3 minutes. Never force it—forcing the dough can cause the log to unravel or tear during baking.Just One Cookbook · Shokupan (Japanese Milk Bread) (Video) 食パンDev reference Checks2
TimingInfoTiming2–3 minutes
Target: 2-3 minute
Expected state: Cover and wait 2–3 minutes.
HoldingMain recipeSource holding instruction
Roll from the center toward the top edge and the bottom edge. This is to release the gas. Nami’s Tip: If the dough springs back or shrinks, it needs more rest. Cover and wait 2–3 minutes. Never force it—forcing the dough can cause the log to unravel or tear during baking.
Why and source
This step has reviewed source-backed guidance.
Step 35
Use the heel of your hand to flatten any thick edges and press out any air bubbles.
Step 36
Pick up the dough, rotate it 90 degrees, and flip it over. It should lie horizontally in front of you like a rounded rectangle. Gently lift the edges to release tension and let the dough relax. Nami’s Tip: When you flip it, the “smooth side” is now facing down.
Step 37
Starting from the center, roll the dough away and back toward you to an even thickness. Square off the corners to form a 7 x 9 inches (18 x 23 cm) vertical rectangle.
Step 38
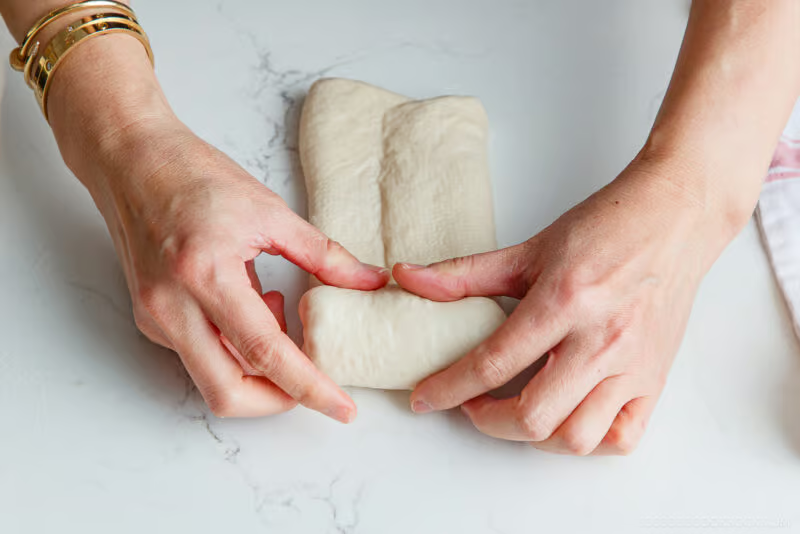
Fold the dough in thirds lengthwise, like a letter. Bring one side to the center, then overlap it with the other side. Press and seal the edges with your fingers to ensure an even thickness. Nami's Tip: If the dough sticks to the surface, lift it gently—never pull, or the delicate surface may tear.
Step 39
Place the rolling pin in the center and press it down. Roll the dough away and back toward you, pressing out any trapped air bubbles.
Step 40
Fold the two upper corners down to meet at the center, forming a pointed tip. Starting from the tip, roll the dough slowly toward you, pulling gently to create a smooth, taut surface (but not too tight). Nami's Tip: Apply the same tension to each log. Consistent tension ensures the pieces rise at the same rate, resulting in a level, perfectly even loaf.
Step 41
Pinch the seam to seal tightly. Place the dough log seam-side down under the damp towel. Repeat with the remaining pieces. Nami's Tip: Keep track of which piece you rolled last.
Step 42
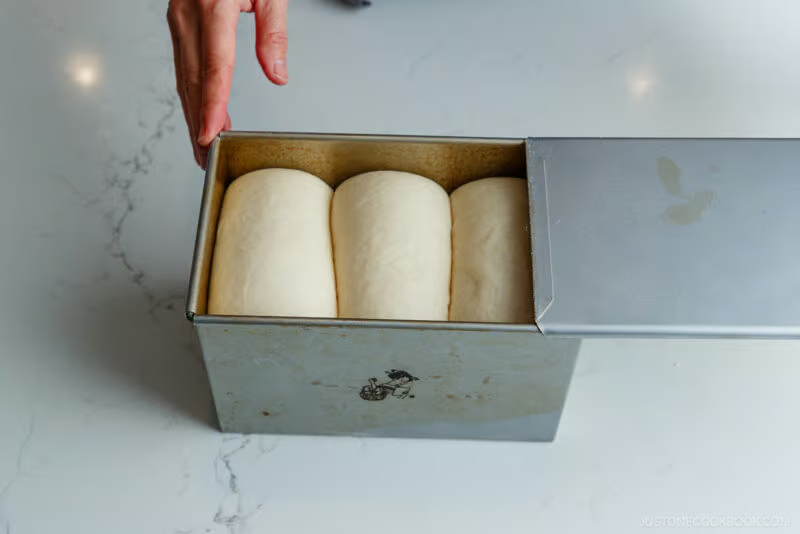
Place the first and second dough logs seam-side down at opposite ends of the loaf pan. Ensure the swirl face inward and the sides are touching the walls.
Step 43
Place the last dough log seam-side down between the first two. The swirl can face either way. Gently press the tops so they rise at the same rate. If one looks much taller than the others, give it an extra gentle pat down to even out the height.
Step 44
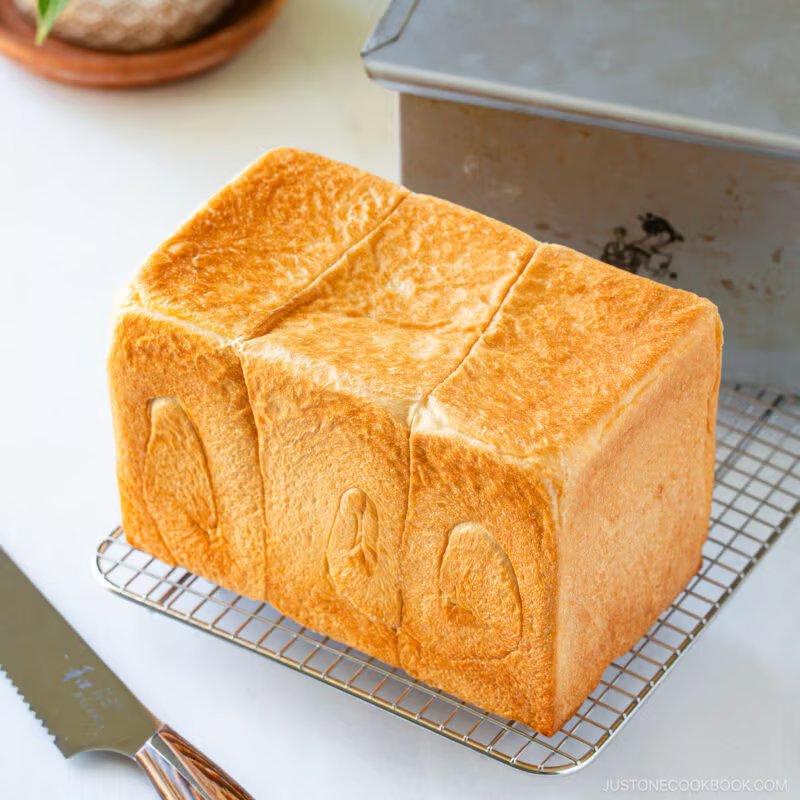
Cover the loaf pan with plastic wrap and proof in a warm place for about 1 hour, or until the dough reaches. Note: If proofing in the oven, remove the loaf pan 20–30 minutes early to allow time to preheat. Flat-topped: 75–80% of the loaf pan's height. The gap allows room for oven spring—if the dough is too high, you won't be able to close the lid, or it may overflow and get stuck.

Image detailsCover the loaf pan with plastic wrap and proof in a warm place for about 1 hour, or until the dough reaches. Note: If proofing in the oven, remove the loaf pan 20–30 minutes early to allow time to preheat.Flat-topped: 75–80% of the loaf pan's height. The gap allows room for oven spring—if the dough is too high, you won't be able to close the lid, or it may overflow and get stuck.Just One Cookbook · Shokupan (Japanese Milk Bread) (Video) 食パンDev reference Visual cue
until the dough reaches.
Checks2
Visual cueInfoVisualuntil the dough reaches.
Expected state: until the dough reaches.
TimingInfoTimingabout 1 hour
Target: 60 minute
Expected state: Cover the loaf pan with plastic wrap and proof in a warm place for about 1 hour, or until the dough reaches.
Troubleshooting1
CautionLoaf Collapse After BakingStep 44 · Step 44Loaf Collapse After Baking
A collapsing loaf is almost always caused by over-proofing.
over-proofing. Here are the most likely causes: Over-proofed during the final proof – The gluten structure was too weak to hold its shape in the oven. Stop the final proof at 75–80% for flat-top and 85–90% for round-top. Sides caved in after removing from the pan – Slam the loaf pan firmly on the counter 1–2 times immediately after baking. This releases trapped steam before it weakens the sides. Oven temperature too low – The crust didn’t set fast enough to support the loaf. Verify your oven temperature with an oven thermometer.
Prevention
A collapsing loaf is almost always caused by over-proofing. Here are the most likely causes: Over-proofed during the final proof – The gluten structure was too weak to hold its shape in the oven. Stop the final proof at 75–80% for flat-top and 85–90% for round-top. Verify your oven temperature with an oven thermometer.
Recovery
Sides caved in after removing from the pan – Slam the loaf pan firmly on the counter 1–2 times immediately after baking.
Why and source
This step has reviewed source-backed guidance.
Step 45
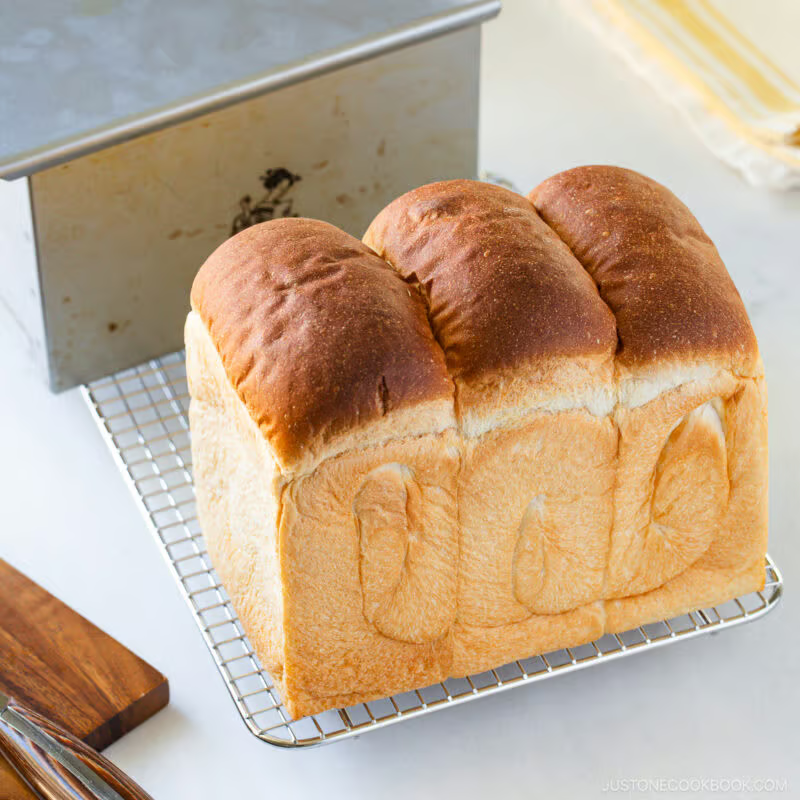
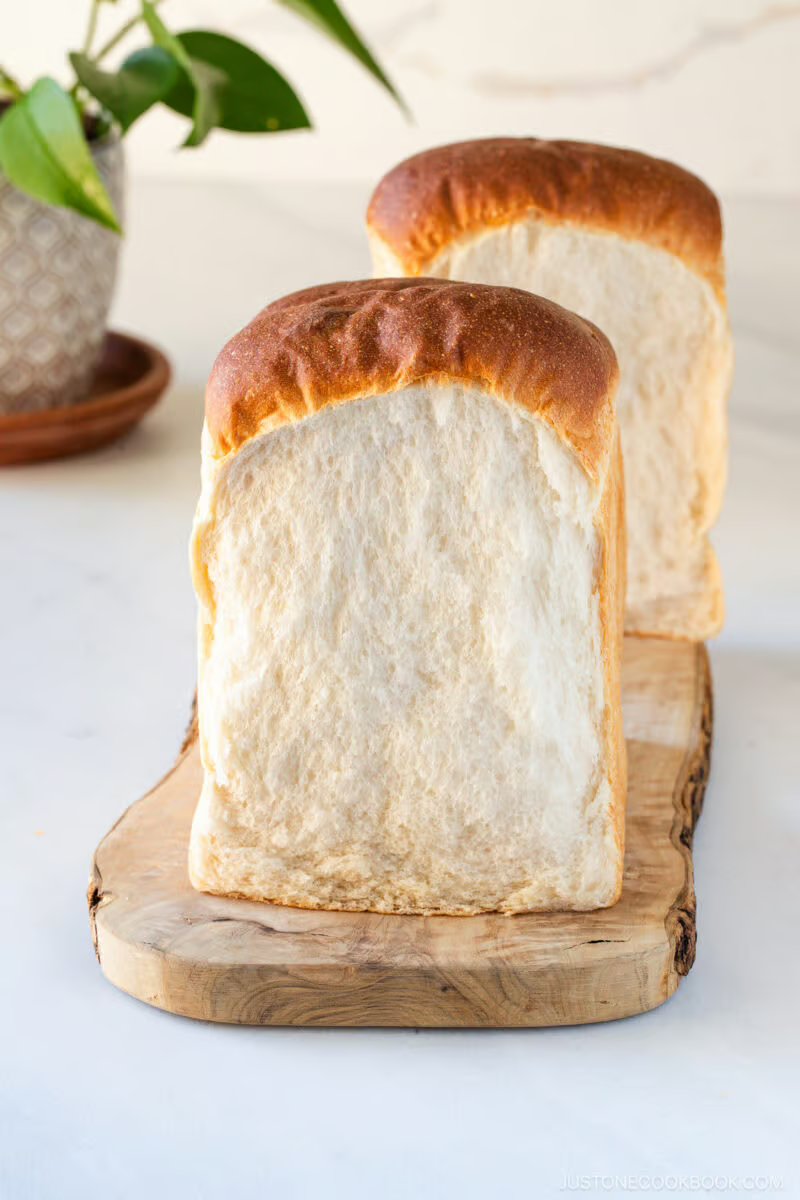
Round-topped: 85–90% of the loaf pan’s height, or until it touches the plastic wrap.

Image detailsRound-topped: 85–90% of the loaf pan’s height, or until it touches the plastic wrap.Just One Cookbook · Shokupan (Japanese Milk Bread) (Video) 食パンDev reference Visual cue
until it touches the plastic wrap.
Checks1
Visual cueInfoVisualuntil it touches the plastic wrap.
Expected state: until it touches the plastic wrap.
Why and source
This step has reviewed source-backed guidance.
Step 46
Preheat to 425°F (220°C). For a convection oven, reduce by 25°F (15°C). Position the rack so the top of the loaf pan is 6–7 inches (15–18 cm) away from the top heating element.
Step 47
Remove the plastic wrap. Flat-topped: If the dough has risen past 80%, switch to round-topped—the lid may get stuck. Otherwise, close the lid. Lower the oven to 410°F (210°C) and bake for 25–30 minutes. Round-topped: Spritz the surface with water. Lower the oven to 385°F (195°C) and bake for 25–30 minutes.

Image detailsRemove the plastic wrap.Flat-topped: If the dough has risen past 80%, switch to round-topped—the lid may get stuck. Otherwise, close the lid. Lower the oven to 410°F (210°C) and bake for 25–30 minutes. Round-topped: Spritz the surface with water. Lower the oven to 385°F (195°C) and bake for 25–30 minutes.Just One Cookbook · Shokupan (Japanese Milk Bread) (Video) 食パンDev reference Checks3
TemperatureInfoTemperature410°F
Target: 410 degree-fahrenheit
Expected state: Lower the oven to 410°F (210°C) and bake for 25–30 minutes.
TemperatureInfoTemperature385°F
Target: 385 degree-fahrenheit
Expected state: Lower the oven to 385°F (195°C) and bake for 25–30 minutes.
TimingInfoTimingfor 25–30 minutes
Target: 25-30 minute
Expected state: Lower the oven to 410°F (210°C) and bake for 25–30 minutes.
Why and source
This step has reviewed source-backed guidance.
Step 48
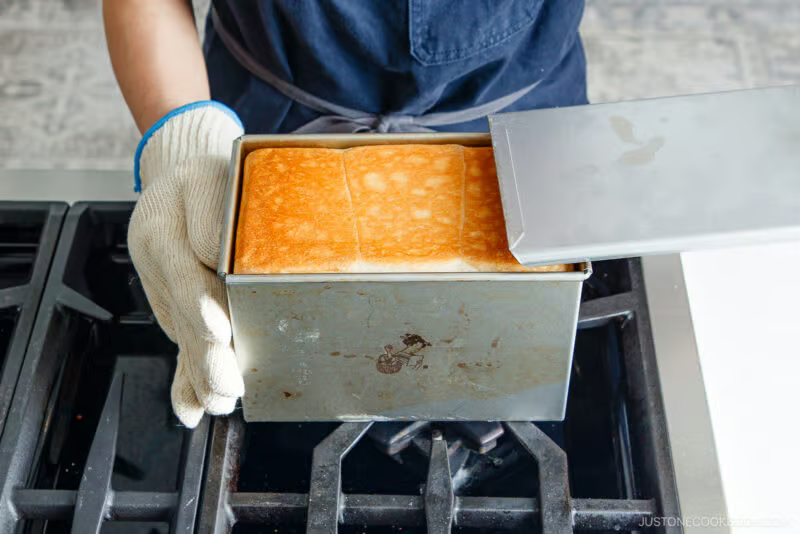
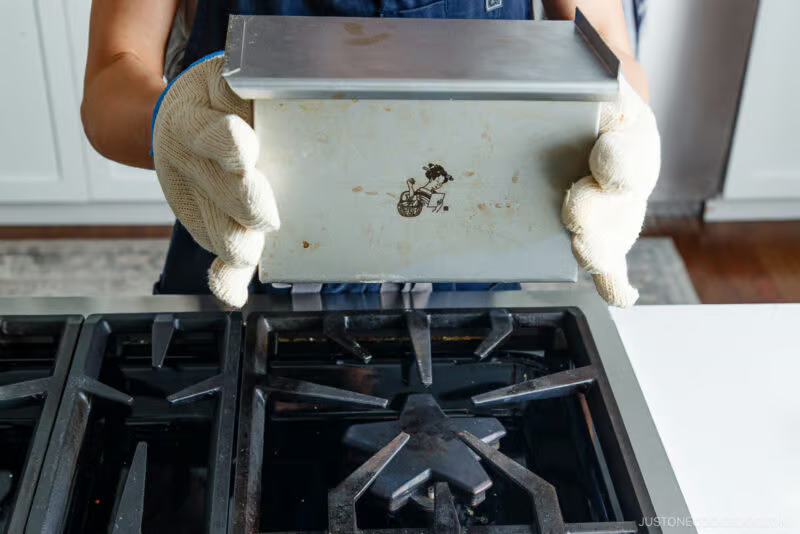
Slam the loaf pan firmly on the counter 1–2 times immediately after removing it from the oven. This releases trapped steam so the sides don’t cave in. Follow the next steps quickly so the bottom doesn’t get soggy from residual steam. For the flat-topped loaf, carefully open the lid. If stuck, slam the loaf pan again. Still stuck? Return it to the oven for 2–3 minutes; the heat will help the lid release. Next time, stop the proof at 75% for more room.

Image detailsSlam the loaf pan firmly on the counter 1–2 times immediately after removing it from the oven. This releases trapped steam so the sides don’t cave in. Follow the next steps quickly so the bottom doesn’t get soggy from residual steam.For the flat-topped loaf, carefully open the lid. If stuck, slam the loaf pan again. Still stuck? Return it to the oven for 2–3 minutes; the heat will help the lid release. Next time, stop the proof at 75% for more room.Just One Cookbook · Shokupan (Japanese Milk Bread) (Video) 食パンDev reference Checks1
TimingInfoTimingfor 2–3 minutes
Target: 2-3 minute
Expected state: Return it to the oven for 2–3 minutes; the heat will help the lid release.
Why and source
This step has reviewed source-backed guidance.
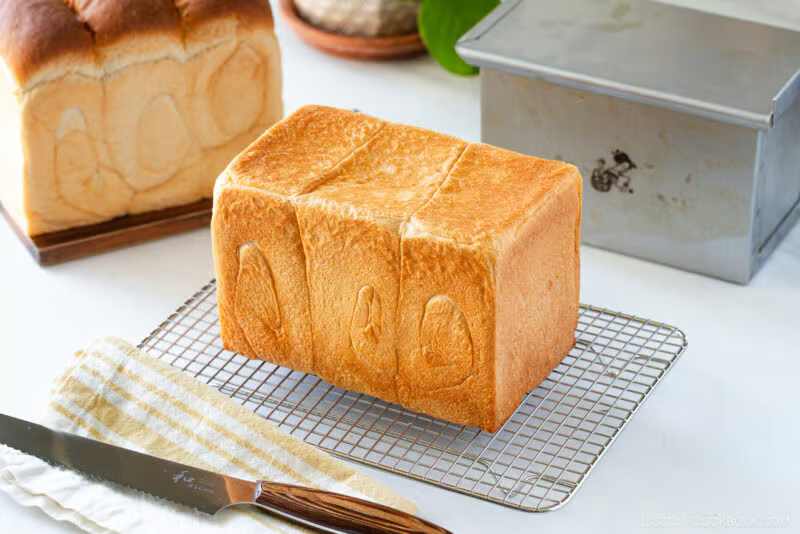
Step 49
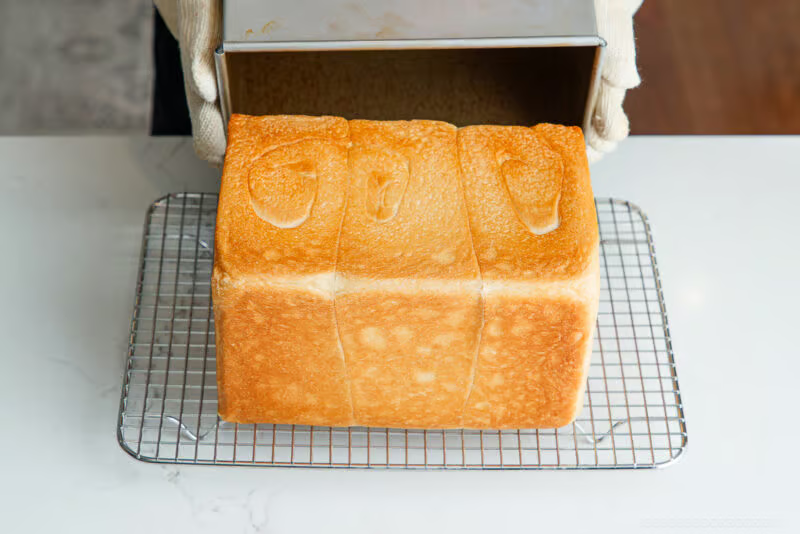
Turn the loaf pan on its side over a wire rack and shake firmly until the loaf slides out. Cool completely for 2–3 hours before slicing. Slicing while hot lets moisture escape, which dries out the bread and ruins the soft textureNami's Tip: Do not wash your shokupan loaf pan! Simply wipe it down with a dry paper towel to remove grease or crumbs. If you must rinse it, dry it immediately and re-season it. Never soak it or leave it wet.

Image detailsTurn the loaf pan on its side over a wire rack and shake firmly until the loaf slides out. Cool completely for 2–3 hours before slicing. Slicing while hot lets moisture escape, which dries out the bread and ruins the soft textureNami's Tip: Do not wash your shokupan loaf pan! Simply wipe it down with a dry paper towel to remove grease or crumbs. If you must rinse it, dry it immediately and re-season it. Never soak it or leave it wet.Just One Cookbook · Shokupan (Japanese Milk Bread) (Video) 食パンDev reference Visual cue
until the loaf slides out.
Checks3
Visual cueInfoVisualuntil the loaf slides out.
Expected state: until the loaf slides out.
TimingInfoTimingfor 2–3 hours
Target: 120-180 minute
Expected state: Cool completely for 2–3 hours before slicing.
HoldingMain recipeSource holding instruction
Turn the loaf pan on its side over a wire rack and shake firmly until the loaf slides out. Cool completely for 2–3 hours before slicing. Slicing while hot lets moisture escape, which dries out the bread and ruins the soft textureNami's Tip: Do not wash your shokupan loaf pan! Simply wipe it down with a dry paper towel to remove grease or crumbs. If you must rinse it, dry it immediately and re-season it. Never soak it or leave it wet.
Troubleshooting1
CautionDough Too Sticky To HandleStep 49 · Step 49Dough Too Sticky To Handle
Shokupan dough is wetter than most bread doughs—some stickiness is completely normal.
more time. Keep going longer than you would with regular bread dough.
Prevention
more time. Keep going longer than you would with regular bread dough.
Recovery
If it’s still very sticky after kneading, it likely needs more time.
Why and source
This step has reviewed source-backed guidance.
Step 50
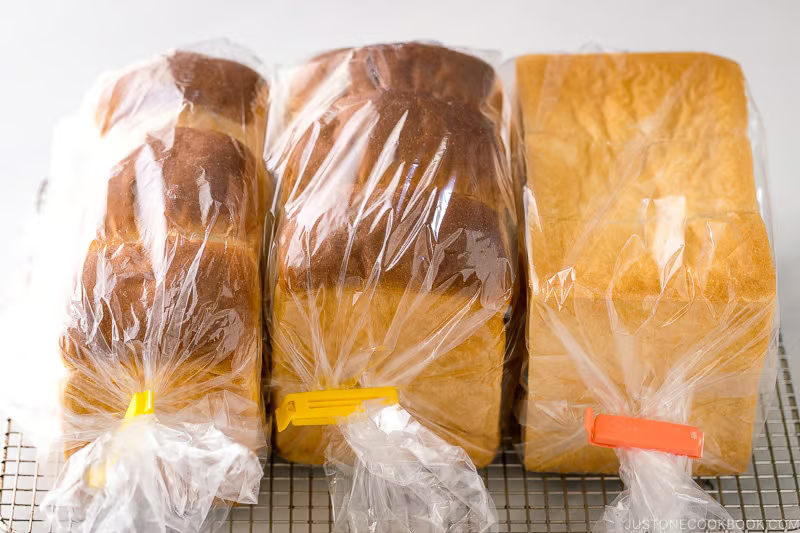
Store a whole loaf you’ll eat within 1–2 days in a plastic bag in a cool place and slice as needed. Do not refrigerate, as cold air dries the bread out. For anything longer, slice and freeze it for up to a month, though it is best enjoyed within the first 2 weeks.

Image detailsStore a whole loaf you’ll eat within 1–2 days in a plastic bag in a cool place and slice as needed. Do not refrigerate, as cold air dries the bread out. For anything longer, slice and freeze it for up to a month, though it is best enjoyed within the first 2 weeks.Just One Cookbook · Shokupan (Japanese Milk Bread) (Video) 食パンDev reference Checks1
HoldingMain recipeSource holding instruction
Store a whole loaf you’ll eat within 1–2 days in a plastic bag in a cool place and slice as needed. Do not refrigerate, as cold air dries the bread out. For anything longer, slice and freeze it for up to a month, though it is best enjoyed within the first 2 weeks.
Why and source
This step has reviewed source-backed guidance.
Step 51
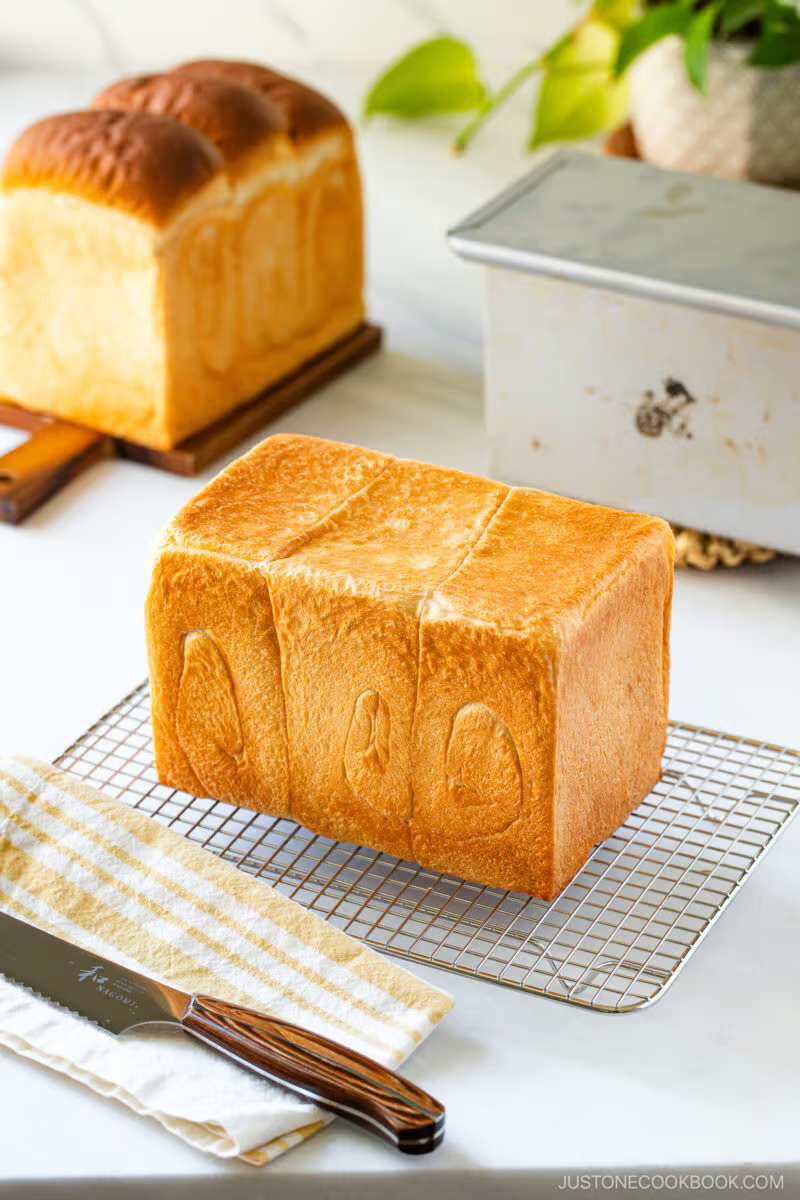
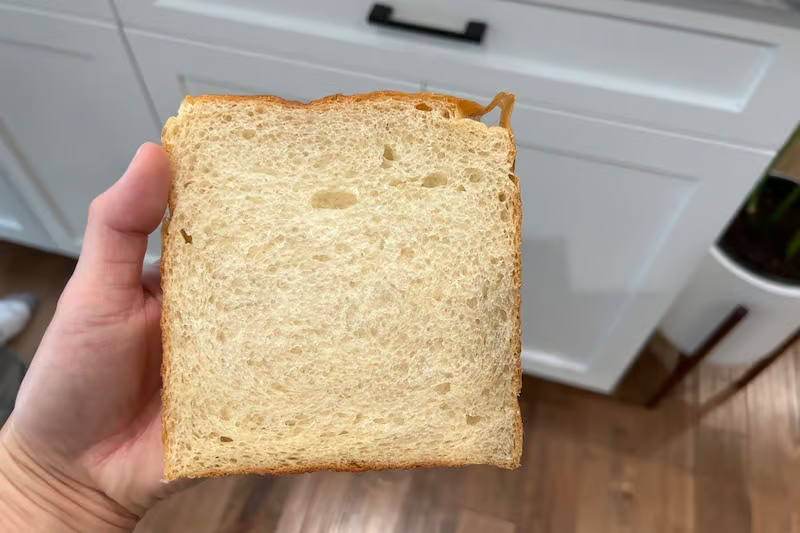
Slice the cooled bread with a bread knife. Enjoy it toasted with butter, jam, or honey, or use soft, untoasted slices for classic Japanese-style sandwiches.
Handling and Storage
Reviewed hold, storage, make-ahead, and service-timing guidance.
Equipment You’ll Need
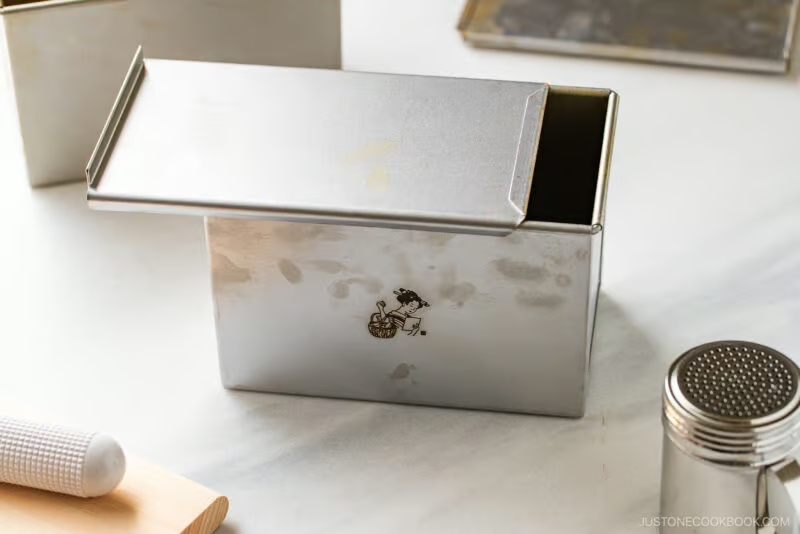
Japanese shokupan loaf pan with lid (1.5 loaf size) – The one from JOC Goods makes the bakery-size loaf sold in Japan.
Many Pullman loaf pans sold online are much smaller. Before baking, make sure to read my How to Season and Care Shokupan Loaf Pan.
Storage Tips
To store: Store the whole loaf in a plastic bag in a cool place out of direct sunlight and slice as needed—good for 1–2 days.
Do not refrigerate as cold air dries the bread out. For anything beyond 2 days, slice and freeze for up to a month; best within the first 2 weeks.
Learn More
Extra cooking notes, tests, and source details kept out of the step-by-step method.
Why this works
Quick kitchen reasons behind the main choices.
Notes: Recipe revision
Most shokupan loaf pans available in the US are too small for authentic Japanese milk bread or sandwiches (sando).
For years, the only option was importing one from Japan—and that always bothered me. So we created one ourselves! The JOC Goods Japanese Shokupan Loaf Pan is the authentic bakery size, now shipping domestically and internationally from the US. This revised recipe is sized specifically for this loaf pan—10% more ingredients than the previous version.
Can I knead Japanese milk bread dough by hand?
Yes, but it’s challenging.
Shokupan dough is wetter and stickier than regular bread dough, which makes it harder to develop the gluten properly by hand. A stand mixer is more reliable.
Article photos
Photos used with the article notes.

Source: Shokupan (Japanese Milk Bread) (Video) 食パン
Recipe structure
Components and intermediate outputs created by the method.
Main recipe
Recipe card ingredients and steps.
1, 1 loaf
Dough
Source step 1 creates or uses dough.
Mixture
Source step 5 creates or uses mixture.
Extra useful notes
Short source-backed recommendations and facts that do not need a step.
Why I Revised This Recipe (May 2026)
Why I Revised This Recipe (May 2026)
Most shokupan loaf pans available in the US are too small for authentic Japanese milk bread or sandwiches (sando).
Most shokupan loaf pans available in the US are too small for authentic Japanese milk bread or sandwiches (sando). For years, the only option was importing one from Japan—and that always bothered me. So we created one ourselves! The JOC Goods Japanese Shokupan Loaf Pan is the authentic bakery size, now shipping domestically and internationally from the US.
This revised recipe is sized specifically for this loaf pan—10% more ingredients than the previous version.
This revised recipe is sized specifically for this loaf pan—10% more ingredients than the previous version.
Once again, I worked with my bread teacher, Mariko, to refine the kneading process and added more detailed guidance for a more reliable, consistent loaf.
Once again, I worked with my bread teacher, Mariko, to refine the kneading process and added more detailed guidance for a more reliable, consistent loaf.
Still using a smaller loaf pan? See my previous shokupan recipe (pdf) for the ingredient amounts (10% less dough) and follow the new instructions.
Still using a smaller loaf pan? See my previous shokupan recipe (pdf) for the ingredient amounts (10% less dough) and follow the new instructions. The improved technique works for any size.
This recipe is optimized for a KitchenAid Artisan Series 5-Qt Stand Mixer (350W).
This recipe is optimized for a KitchenAid Artisan Series 5-Qt Stand Mixer (350W). If using a different model, adjust as follows:
KitchenAid Classic (275W): Do not double the recipe; the motor is not powerful enough for the heavy dough.
KitchenAid Classic (275W): Do not double the recipe; the motor is not powerful enough for the heavy dough.
Professional Series (Spiral Hook): You must double the recipe to engage the hook.
Professional Series (Spiral Hook): You must double the recipe to engage the hook. Knead 1.5x longer at each step (please use this as guidance).
More source notes
Useful article notes that do not need to interrupt the cooking method.
Dough Too Sticky To Handle
Shokupan dough is wetter than most bread doughs—some stickiness is completely normal.
more time. Keep going longer than you would with regular bread dough.
Dough Pass The Windowpane Test
If the dough tears instead of stretching into a thin, translucent membrane, the gluten isn’t fully developed.
Under-kneaded – Knead for 1 more minute on Speed 6 and test again. Repeat until it passes. Butter added too early – Always wait until the dough is smooth and clears the bowl before adding butter. Fat blocks gluten from forming. Dough too cold – Cold dough is stiff and resists stretching. It may simply need extra kneading time.
Dough Slack And Gooey
If the dough suddenly turns slack and gooey, the gluten has collapsed from overheating—and it cannot be saved.
Dough Lose Its Smooth Skin During Shaping
The smooth skin is fragile—once it breaks, it’s hard to recover.
Dough sticking to the work surface – If the dough sticks, lift it gently with a dough scraper. Never pull it—pulling breaks the skin. Too much flour on the work surface – Excess flour prevents the dough from gripping properly during tension pulling, making it harder to form a smooth, taut skin. Skipped or shortened bench rest – If the dough springs back while rolling, it needs more rest. Cover and wait 2–3 minutes before trying again. Never force it. Rolling too tightly – Roll the log slowly with gentle, even tension. Too much force ruptures the skin.
Recipe Utilities
Account actions, source details, export, and reporting stay available without interrupting the cooking flow.
Source and Origin
Origin declaration
Adapted from source
Imported from the just-one-cookbook page for dev review.
Copy risk: Unchecked
Shokupan (Japanese Milk Bread) (Video) 食パン
Article
View source
My Kitchen Actions
Login is required.
My Kitchen keeps saved recipes, private notes, adaptations, cooking logs, imports, and exports tied to your account.
Export
Public recipe exports include only approved public content. Personal backup exports require login.
Export history
No exports yet.