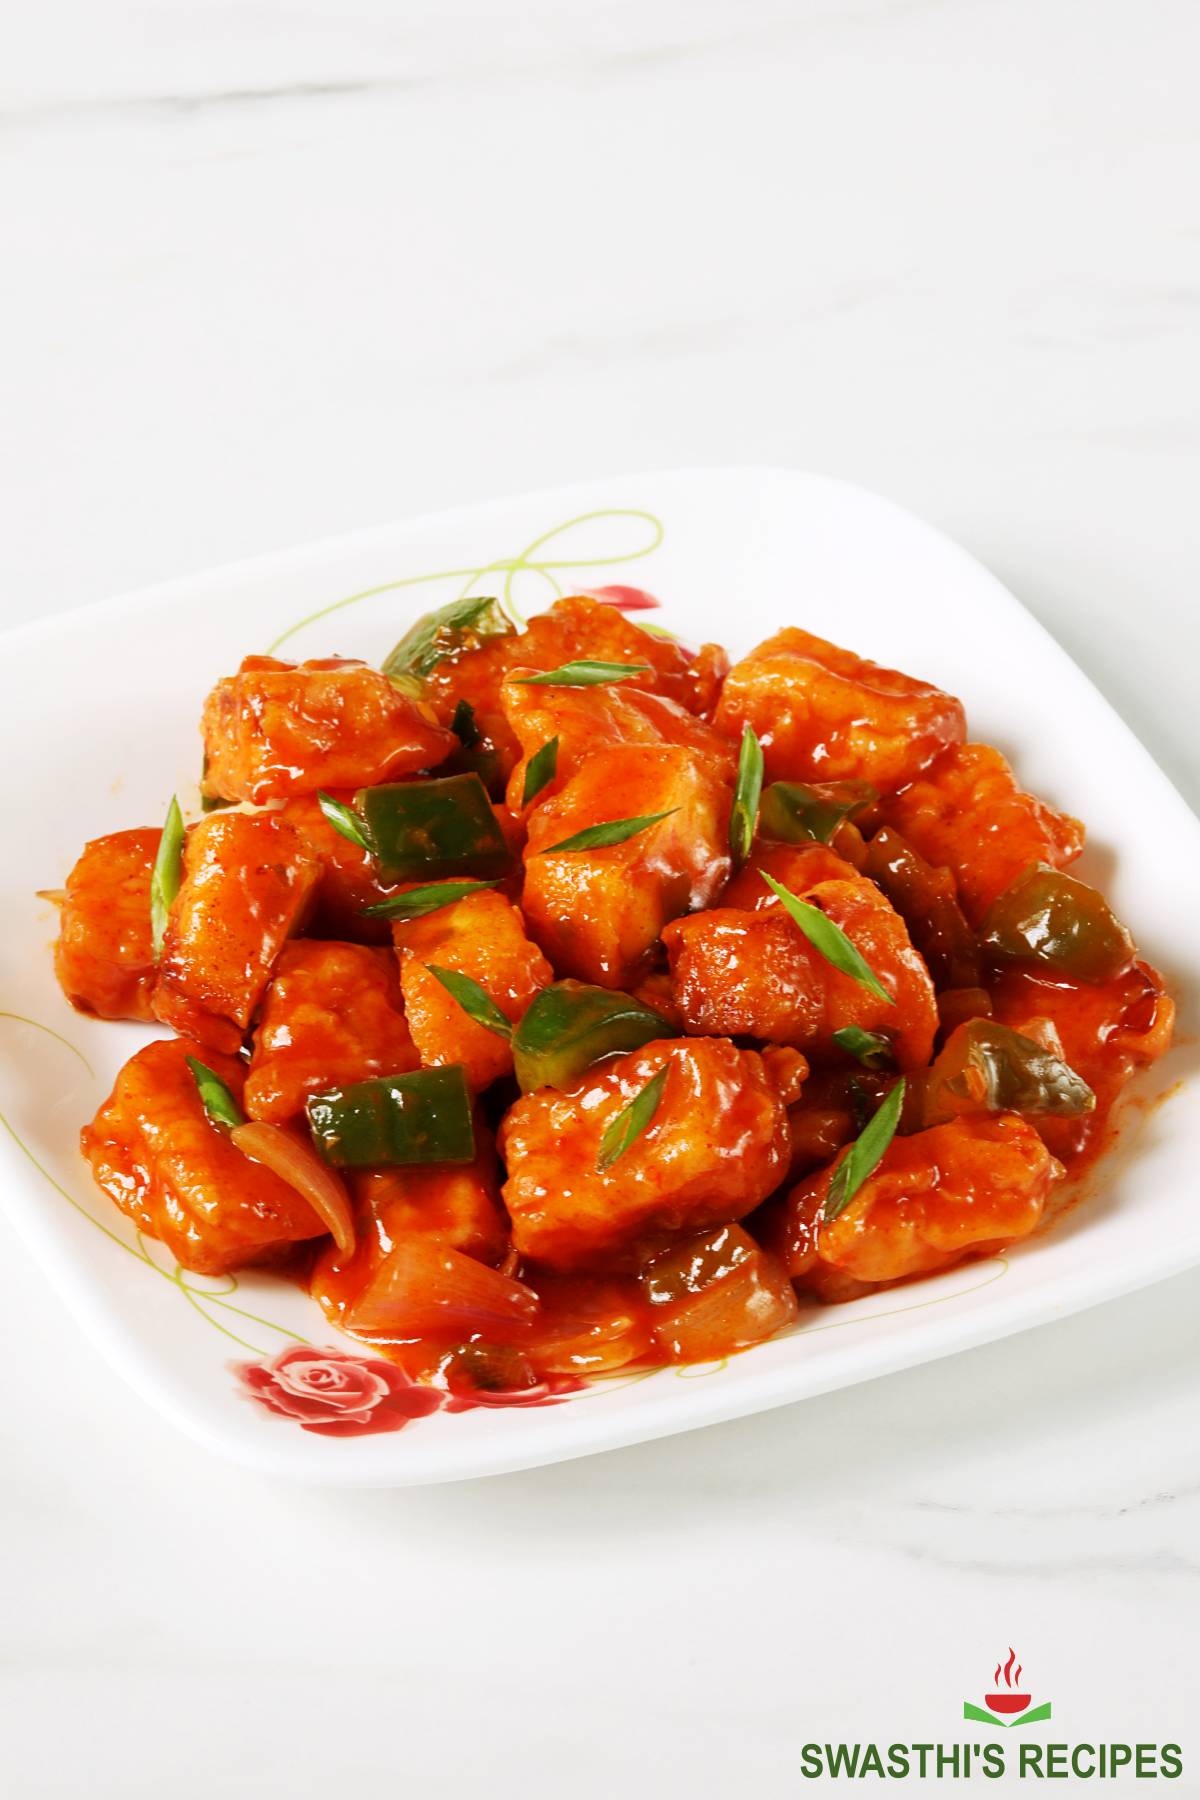
Chilli Paneer (Dry & Gravy)
Chilli paneer recipe video - Learn how to make chilli paneer dry and gravy like we get in Indo chinese restaurants. Delicious & easy to make
Dish: Chilli Paneer
Variant: Chilli Paneer (Dry & Gravy)
- Total time
- 25 min
- Active time
- 7 min
- Yield
- 4, 4 people
- Difficulty
- Medium
Ingredients and Constraints
Ingredients
- Optional
- Optional
- Optional
Ingredient watchpoints11 watchpoints
Short requirements and tradeoffs to check while gathering ingredients; detailed source notes stay expandable.
Chili Powder
¼ teaspoon red chilli powder ((kashmiri or less spicy kind) (optional))
The source row includes a form, size, temperature, preparation, or handling detail.
Details and source
All-purpose flour
3 tablespoons all-purpose flour ((maida) (optional))
The source row includes a form, size, temperature, preparation, or handling detail.
Details and source
Black Pepper
⅛ teaspoon black pepper ((crushed or ground))
The source row includes a form, size, temperature, preparation, or handling detail.
Details and source
Salt
⅛ teaspoon salt ((adjust to taste))
The source row includes a form, size, temperature, preparation, or handling detail.
Details and source
Red Chilli Sauce
2 tablespoons red chilli sauce ((or 1 tbsp hot sauce or green chilli sauce)(adjust to taste))
The source row includes a form, size, temperature, preparation, or handling detail.
Details and source
Chili Powder
½ teaspoon red chili powder ((or red chilli paste, optional))
The source row includes a form, size, temperature, preparation, or handling detail.
Details and source
Sugar
1 teaspoon sugar ((adjust to taste))
The source row includes a form, size, temperature, preparation, or handling detail.
Details and source
Garlic
1 tablespoon garlic ((finely chopped ))
The source row includes a form, size, temperature, preparation, or handling detail.
Details and source
Spring Onions
2 tablespoon spring onions ((greens chopped ))
The source row includes a form, size, temperature, preparation, or handling detail.
Details and source
Spring Onions
2 tablespoon spring onion ((whites chopped))
The source row includes a form, size, temperature, preparation, or handling detail.
Details and source
Black Pepper
¼ teaspoon black pepper ((crushed black pepper))
The source row includes a form, size, temperature, preparation, or handling detail.
Details and source
Additional ingredient notes
Tips to limit refined flour
If you are a health nut like me and prefer to limit refined flour, then here are the tips I follow Skip all-purpose flour or maida from the recipe completely.
Use wheat flour or whole wheat pastry flour to make the batter. Sometimes I totally skip the corn starch for the sauce and just pour 3 to 4 tbsps water. As red chilli sauce already has some starch in it, adding water thins it down and helps to coat the paneer well. I have followed the same in the step by step photo method. Other option is to just replace corn starch (for sauce) with arrowroot powder. Always choose naturally brewed or organic soya sauce. Check the labels before you buy the red chilli sauce. Avoid those having msg & colors.
Method Overview
Structured method notes that are separate from the step timeline.
Fry Paneer
Heat a pan with 3 to 4 tablespoons oil.
Check if the oil is hot enough by adding a small portion of batter to the hot oil. It must rise up without browning. This is the correct heat. Gently slide the paneer one by one spacing them apart in the oil. This prevents them from sticking to each other. Fry them on a medium high flame. Important: Spread them in the pan while frying else they stick to each other. Stir well and fry evenly until golden.
Notes
To make the dry version, you can completely skip the corn slurry and just add the sauces.
Pour 3 tbsps water and bring the sauce to a boil. Turn off and then add the paneer. In the video I have shown making chilli paneer that has more sauce than the one shown in step by step pictures. The recipe is the same as mentioned in the recipe card with 1 tsp cornflour and half cup water.
Source video
Source video
Method Timeline
Prep
ActivePrep
7 min
Prep time from the source recipe card.
Cook
ActiveCook
18 min
Cook time from the source recipe card.
Total
PassiveTotal
25 min
Total time from the source recipe card.
Step 1
Add 3 tablespoons corn flour, 3 tablespoons all-purpose flour (maida, optional), 1/8 teaspoon salt, ¼ teaspoon red chilli powder and 1/8 teaspoon pepper powder to a mixing bowl.
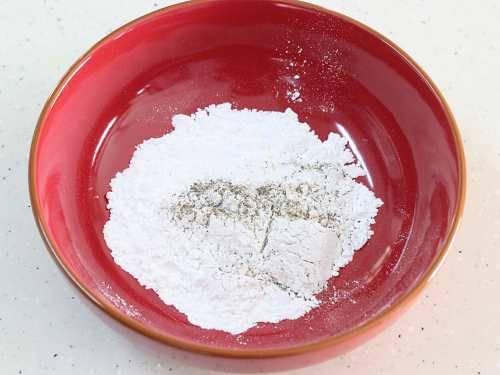
Image detailsadding corn flour, salt, chili to a mixing bowlSwasthis Recipes · Chilli Paneer Recipe (Restaurant Style)Dev reference Inputs and tools6
Uses
- ¼ teaspoon red chilli powder ((kashmiri or less spicy kind) (optional))
- 3 tablespoons all-purpose flour ((maida) (optional))
- ⅛ teaspoon black pepper ((crushed or ground))
- ⅛ teaspoon salt ((adjust to taste))
- ½ teaspoon red chili powder ((or red chilli paste, optional))
- ¼ teaspoon black pepper ((crushed black pepper))
Step 2
Pour 5 to 6 tablespoons water and make a batter that is neither too thick nor too thin. If the batter is too runny, it will not coat the paneer. Add more water only if needed. Check video for batter consistency. Restaurant style chilli paneer has a thick coating of batter.
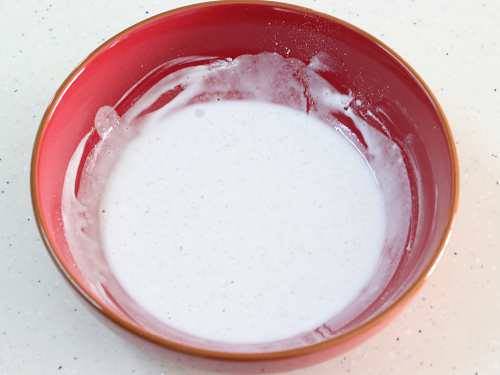
Image detailsmaking batter for chilli paneerSwasthis Recipes · Chilli Paneer Recipe (Restaurant Style)Dev reference Inputs and tools3
Uses
- 200 grams paneer ((cubed to ¾ by ¾ inch pieces))
- water (( as needed))
- ½ cup water ((1 cup for more gravy) (adjust as needed))
Step 3
Add 200 grams cubed paneer to the batter. Then coat them well with batter. Alternative way: If you like, you can also marinate paneer with ½ tbsp chilli sauce, ¼ tbsp soya sauce and just add some dry flour to the paneer. It can be grilled, tawa fried, shallow fried or deep fried.
Step 4
Heat a pan with 3 to 4 tablespoons oil. Check if the oil is hot enough by adding a small portion of batter to the hot oil. It must rise up without browning. This is the correct heat.
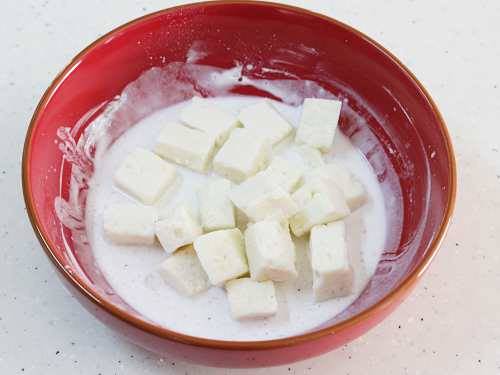
Image detailscoating the paneer in batter for chilli paneerSwasthis Recipes · Chilli Paneer Recipe (Restaurant Style)Dev reference Inputs and tools1
Uses
- 3 to 4 tablespoon oil ((as needed for shallow frying))
Step 5
Gently slide the paneer one by one spacing them apart in the oil. This prevents them from sticking to each other. Fry them on a medium high flame. Important: Spread them in the pan while frying else they stick to each other.
Step 6
Stir well and fry evenly until golden. You may not get the golden color if you have not used chili sauce or chilli powder.
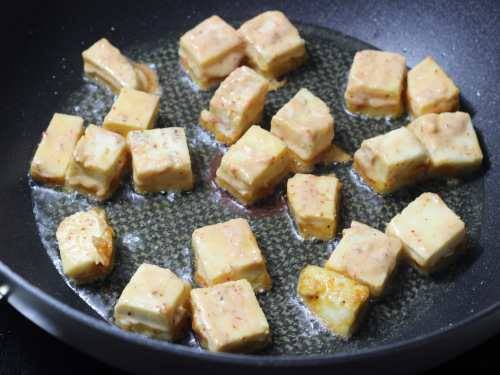
Image detailsfrying paneerSwasthis Recipes · Chilli Paneer Recipe (Restaurant Style)Dev reference Visual cue
until golden.
Checks1
Visual cueInfoVisualuntil golden.
Expected state: until golden.
Why and source
This step has reviewed source-backed guidance.
Step 7
Drain them on a kitchen tissue or colander.

Image detailsgolden fried paneerSwasthis Recipes · Chilli Paneer Recipe (Restaurant Style)Dev reference 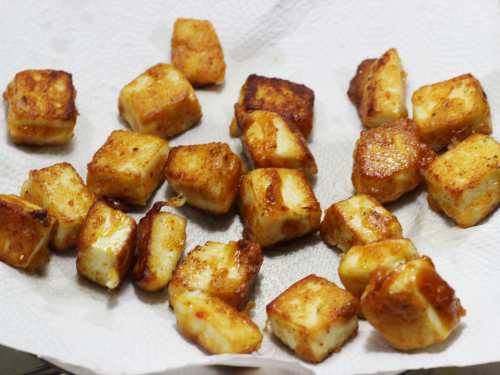
Image detailsremove paneer fro oil for chilli paneerSwasthis Recipes · Chilli Paneer Recipe (Restaurant Style)Dev reference Step 8
Heat 1 tbsp oil in the same pan. Or remove the excess oil from the pan and retain 1 tablespoon in it. Add 1 tablespoon garlic and saute until they smell good.
Step 9
Switch the flame to high. Add cubed onions, spring onions greens, capsicum, sliced and deseeded chilli. Saute on a high flame till they are slightly cooked but still crunchy. While the veggies fry, go ahead to the next step.
Step 10
For the restaurant style dry chilli paneer with glossy look – Add 1 tsp of corn flour with half cup water to a bowl. Stir well and set aside. For a healthier version, you can even skip using corn flour like the way I did. The smooth feel of sauce and the glaze will be missing. If you want to make the gravy version scroll down to step 15
Step 11
Once the veggies are fried for a minute, pour 1 tablespoon soya sauce, ½ to 1 teaspoon vinegar, 1 to 2 tablespoons red chilli sauce or green chilli sauce, 2 tbsps tomato ketchup and ½ teaspoon chilli powder (optional) or paste.
Step 12
Stir the corn flour mixture we made earlier with a spoon and pour it to the pan. If you are trying to reduce corn starch in your foods then just add 3 tbsps water here instead of corn flour slurry. Red chilli sauce has some starch in it. So that will be enough to coat the paneer. Then allow the sauces to bubble and thicken as well. Taste the sauce and add more salt & sauces if needed. Turn off the stove and let the sauce cool down a bit.
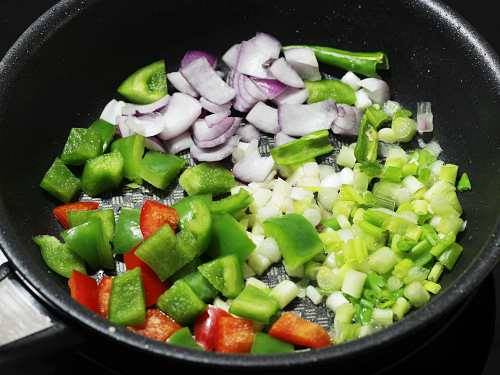
Image detailsfrying veggies for chilli paneerSwasthis Recipes · Chilli Paneer Recipe (Restaurant Style)Dev reference 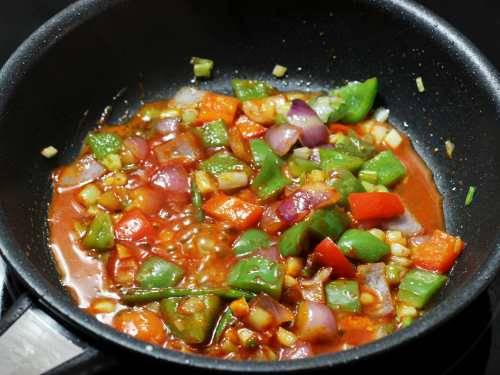
Image detailsSeason Chilli PaneerSwasthis Recipes · Chilli Paneer Recipe (Restaurant Style)Dev reference Checks1
HoldingMain recipeSource holding instruction
Stir the corn flour mixture we made earlier with a spoon and pour it to the pan. If you are trying to reduce corn starch in your foods then just add 3 tbsps water here instead of corn flour slurry. Red chilli sauce has some starch in it. So that will be enough to coat the paneer. Then allow the sauces to bubble and thicken as well. Taste the sauce and add more salt & sauces if needed. Turn off the stove and let the sauce cool down a bit.
Why and source
This step has reviewed source-backed guidance.
Step 13
Next add ¼ teaspoon pepper powder, fried paneer, 2 tablespoons spring onion greens. If you have not used any corn slurry for the sauce then toss on a high flame for 1 to 2 minutes to bring a smoky aroma. Garnish chilli paneer with spring onions. This picture is when I made it without cornstarch for sauce. This one is with 1 tsp corn starch and half cup water. This is from the video.
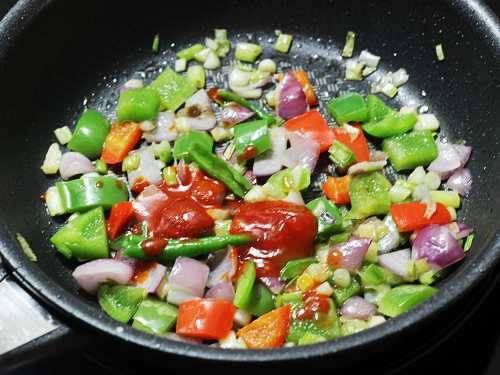
Image detailsSeason Chilli PaneerSwasthis Recipes · Chilli Paneer Recipe (Restaurant Style)Dev reference 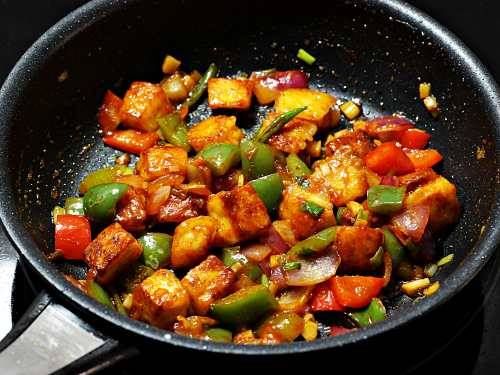
Image detailsSeason Chilli PaneerSwasthis Recipes · Chilli Paneer Recipe (Restaurant Style)Dev reference Checks1
TimingInfoTimingfor 1 to 2 minutes
Target: 1-2 minute
Expected state: If you have not used any corn slurry for the sauce then toss on a high flame for 1 to 2 minutes to bring a smoky aroma.
Inputs and tools2
Uses
- 3 tablespoons cornstarch ((white corn flour))
- 1 teaspoon cornstarch ((2 tsps for more gravy))
Why and source
This step has reviewed source-backed guidance.
Learn More
Extra cooking notes, tests, and source details kept out of the step-by-step method.
Recipe structure
Components and intermediate outputs created by the method.
Main recipe
Recipe card ingredients and steps.
4, 4 people
Batter
Source step 2 creates or uses batter.
Garnish
Source step 13 creates or uses garnish.
Mixture
Source step 12 creates or uses mixture.
Paste
Source step 11 creates or uses paste.
Sauce
Source step 3 creates or uses sauce.
Extra useful notes
Short source-backed recommendations and facts that do not need a step.
To make the dry version, you can completely skip the corn slurry and just add the sauces.
To make the dry version, you can completely skip the corn slurry and just add the sauces. Pour 3 tbsps water and bring the sauce to a boil. Turn off and then add the paneer.
In the video I have shown making chilli paneer that has more sauce than the one shown in step by step pictures.
In the video I have shown making chilli paneer that has more sauce than the one shown in step by step pictures. The recipe is the same as mentioned in the recipe card with 1 tsp cornflour and half cup water.
Mention @SwasthisRecipes or tag #swasthisrecipes!
Mention @SwasthisRecipes or tag #swasthisrecipes!
More source notes
Useful article notes that do not need to interrupt the cooking method.
Soggy or Watery Result
The result turns soggy or watery.
Adding too much water to the sauce will over cook onions & capsicum making them soggy.
Recipe Utilities
Account actions, source details, export, and reporting stay available without interrupting the cooking flow.
Source and Origin
Origin declaration
Adapted from source
Imported from the swasthis-recipes page for dev review.
Copy risk: Unchecked
Chilli Paneer Recipe (Restaurant Style)
Article
View source
My Kitchen Actions
Login is required.
My Kitchen keeps saved recipes, private notes, adaptations, cooking logs, imports, and exports tied to your account.
Export
Public recipe exports include only approved public content. Personal backup exports require login.
Export history
No exports yet.